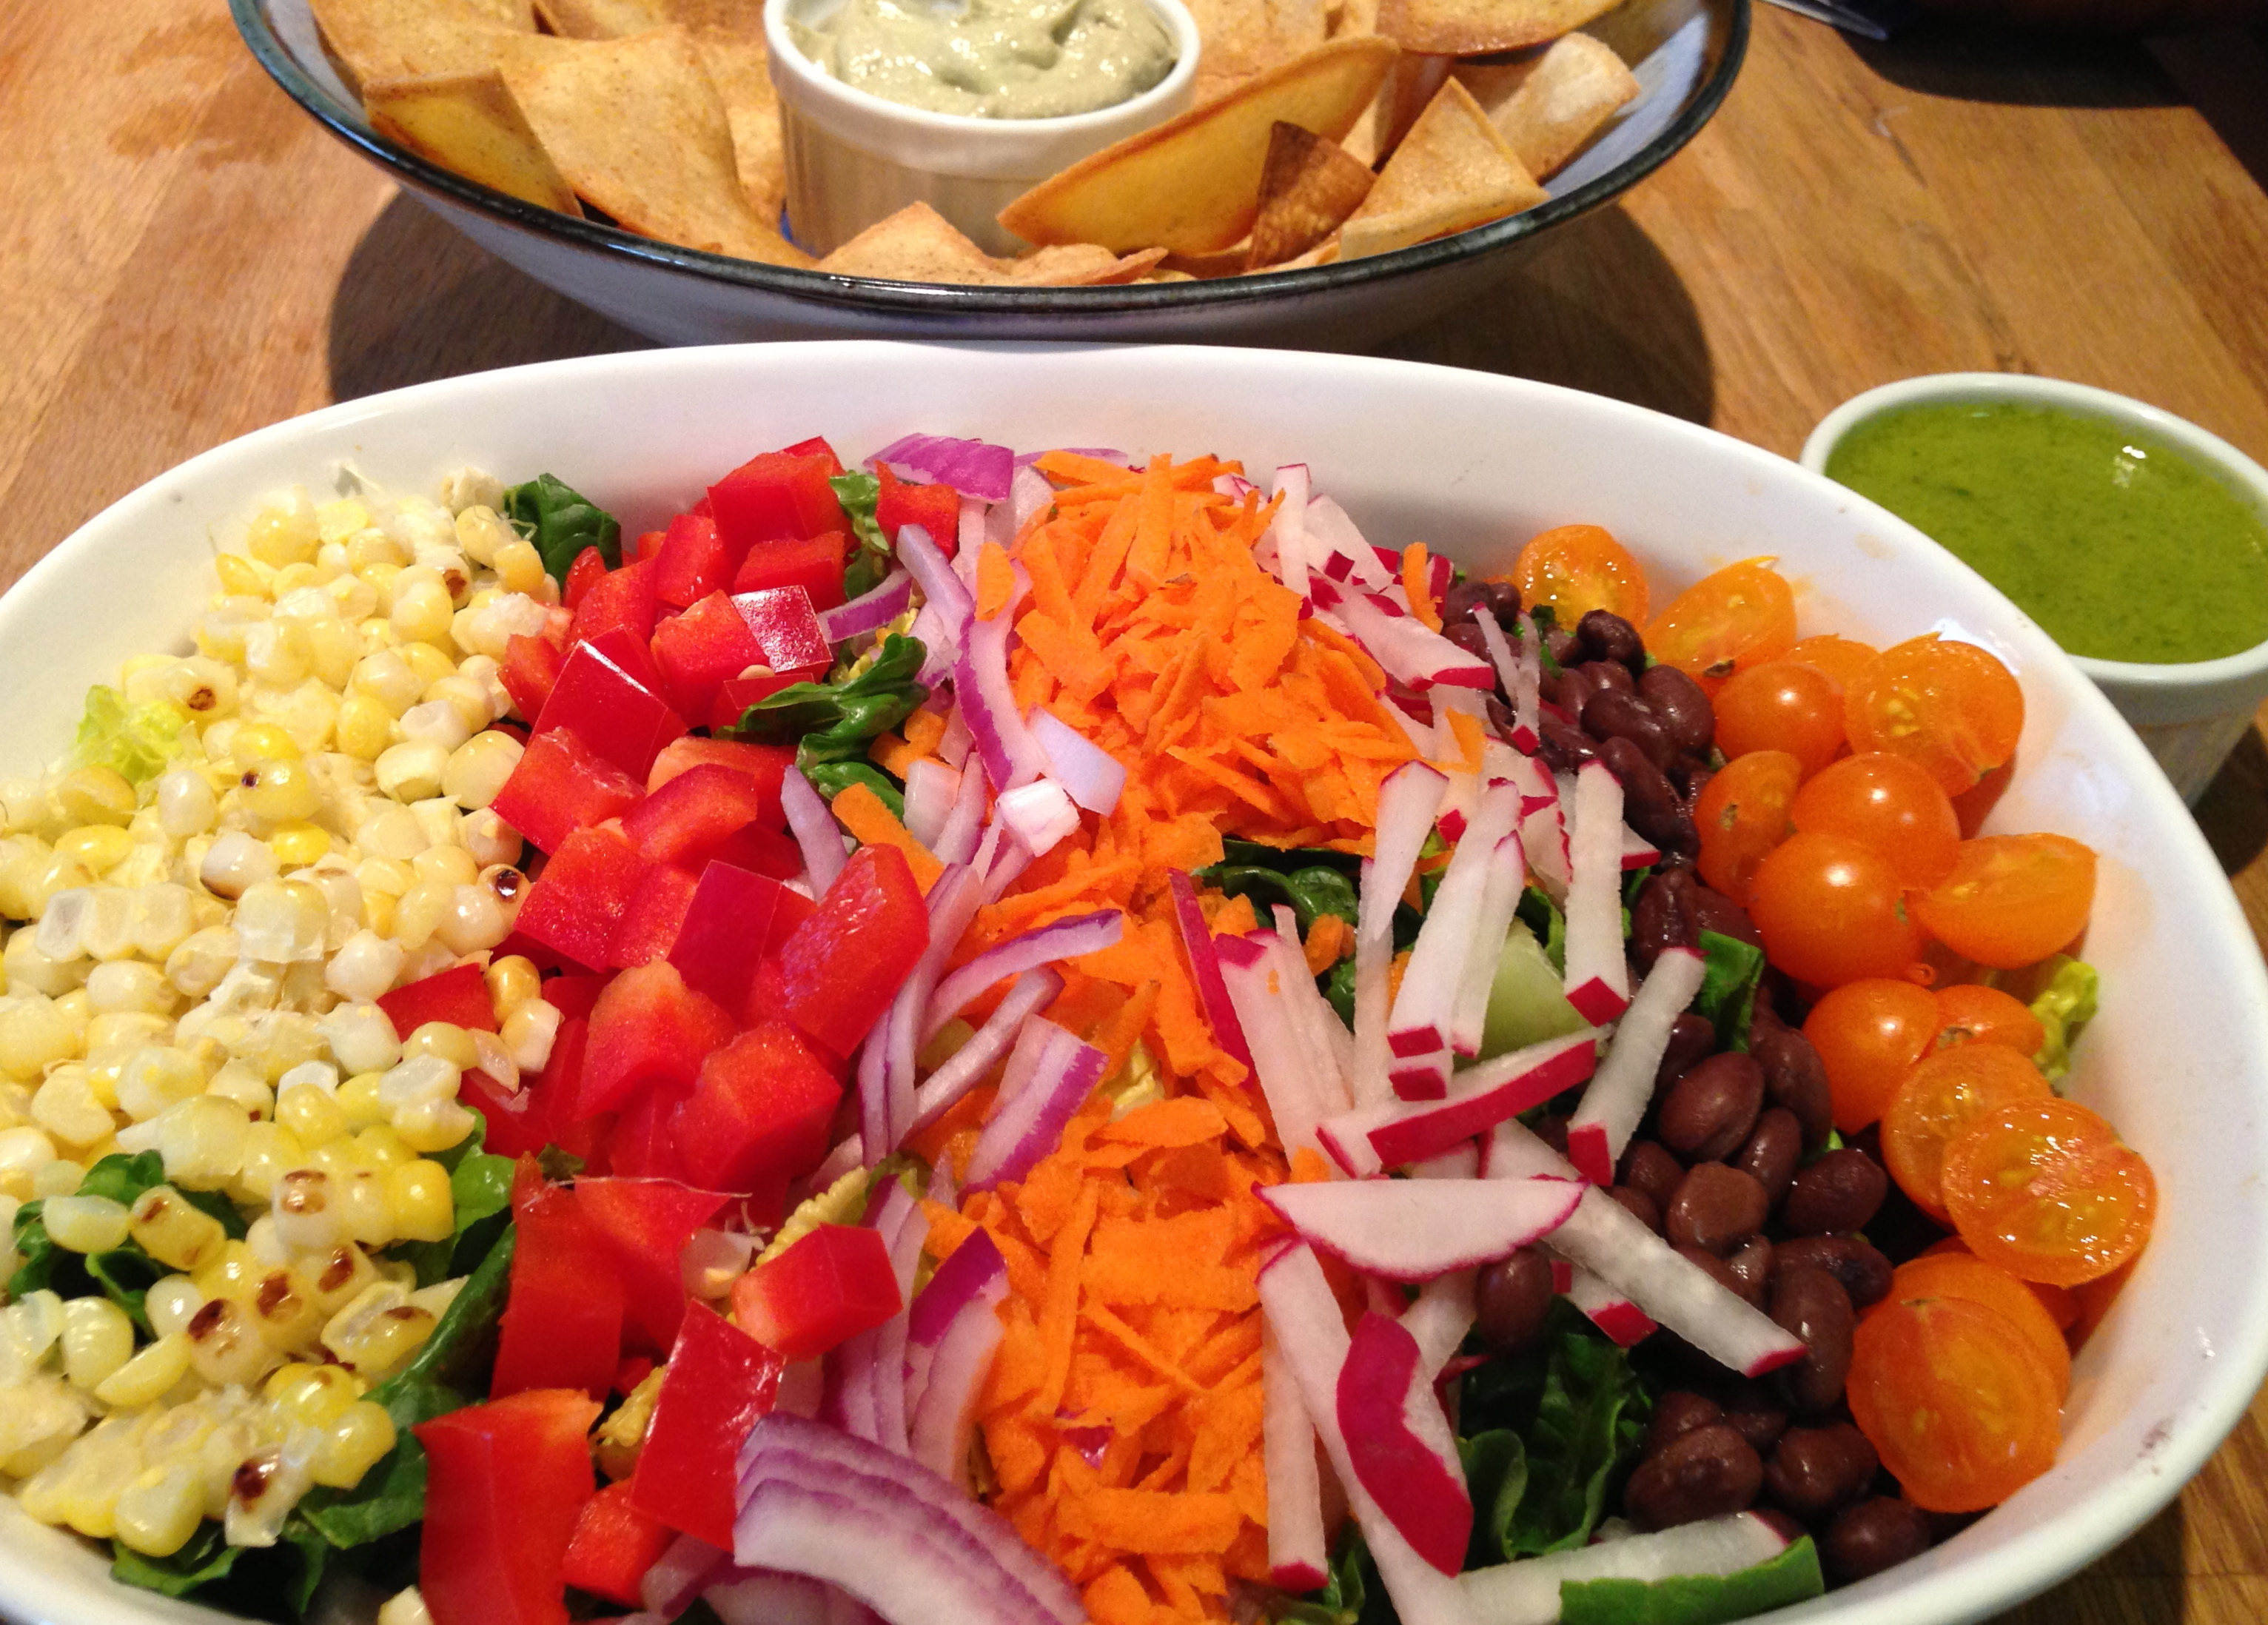
This post features a bunch of recipes. Not only is there the salad and dressing, but I also want to share this simple way to make baked chips. I served it with leftover vegan cashew avocado “cream” from these incredible tofu tacos I discovered on Love and Lemons.
To make the salad (I measured nothing):
Put some chopped romaine lettuce in a bowl.
Top with the following: I chose to do it cobb-salad style, but you can toss it all together, too. Go loco.
- radishes
- cherry tomatoes
- grilled corn (Soak it first for about a half an hour. Grill on medium-high for about 10 minutes, rotating a few times. Then, let it cool and cut it off the cob)
- shredded carrots
- chopped red bell peppers
- thinly sliced red onions
- drained black beans
- optional: shredded cheddar cheese
- You can also do: avocado, jicama, etc.
Basic cilantro-lime dressing:
Blend the following until smooth:
- 2 handfuls of cilantro
- juice of 2 limes
- a little bit of honey (or agave or sweetener of your choice)
- salt/pepper
- a few tablespoons of olive oil
- water to thin out as needed
For the chips:
- Preheat oven to 350 degrees
- Prepare oil: Mix together a few tablespoons of olive oil with spices of your choice. I did a few shakes of cumin and paprika, and then a few pinches of salt.
- Put a stack of corn tortillas on a cutting board and cut them into sixths (first cut in half and then cut each half into thirds)
- Arrange tortilla triangles in a single layer on a cookie sheet (no overlapping) and brush both sides with the oil mixture. Bake for 20-25 minutes, or until slightly brown and crispy.
- Serve with salad and dip of choice.

I’ve started this post multiple times, but keep deleting the first sentence. I wanted to lead with how the runny yolk makes the rice velvety. However, “runny yolk” just doesn’t sound as good as it tastes. Trust me on this one. You can prepare the egg however you like, runny or sedentary. We tried over easy and poached.
Ingredients:
I don’t know how much of each rice bowl topping you want. You decide. The amount listed for each dressing ingredient was enough for 2 rice bowls.
- brown rice
- raw peanuts
- 1 T sesame oil
- 1 clove garlic
- juice of 1 lime
- 1 T chopped mint
- 1 T chopped cilantro
- 1 t soy sauce
- shredded carrots
- chopped scallions
- seeded and diced cucumbers
- bean sprouts
- steamed and chopped baby bok choy (or other greens)
Instructions
1. Prepare brown rice as directed.
2. Roast peanuts in a heavy, dry skillet, stirring constantly. Let cool. Chop peanuts (I put them in a bag and used the side of a large wooden spoon to crush)
3. Combine the next 6 ingredients (through soy sauce) in a medium bowl, and stir.
3. Divide the rice into the number of servings you’re making. Top with the carrots, scallions, cucumbers, bean sprouts, and bok choy. I think it looks pretty to make sections for each vegetable. Pour 1-2 teaspoons of the dressing over each bowl of rice/vegetables.
4. Prepare the egg as desired. Place it in the center, on top of the vegetables.
5. Sprinkle with peanuts and serve immediately. If you like it spicy, serve with a side of chili garlic sauce.

I had to take advantage of the tomatoes that were still at the farmer’s market this chilly weekend. Also, I picked up some eggs from Grazin’ Angus Acres stand. They are a farm in Ghent, NY, and their eggs have the “Animal Welfare Approved” sticker. Not only are the chickens a lot happier than your typical chickens, but the eggs really are delicious as well.
I didn’t have any curry powder on hand, so I mixed the following spices to make my own version of pseudo-curry powder: red pepper flakes, turmeric, yellow mustard seed, brown mustard seed, coriander, hungarian paprika, cumin, and cloves.
Also, I used the egg-poaching advice from Smitten Kitchen and it worked out well.
Thanks to Cooking Light for this recipe!
Ingredients:
- 1 cup dried small red lentils
- 3 cups water
- 1 bay leaf
- 2 teaspoons olive oil
- 1 cup chopped onion
- 1 cup chopped tomato
- 1 teaspoon curry powder
- 1/4 teaspoon ground cumin
- 1/2 teaspoon salt, divided
- 1/8 teaspoon ground red pepper
- 1 garlic clove, minced
- 1 tablespoon white vinegar
- 4 large eggs
- 1/4 teaspoon freshly ground black pepper
- 1/4 cup plain low-fat Greek yogurt
- 2 tablespoons chopped fresh cilantro
Directions:
- Combine first 3 ingredients in a large saucepan. Bring to a boil. Cover, reduce heat, and simmer 20 minutes or until lentils are tender. Drain; discard bay leaf.
- Heat a nonstick skillet over medium-high heat. Add oil to pan; swirl to coat. Add onion and tomato; sauté 8 minutes or until onion is tender. Add curry, cumin, 1/4 teaspoon salt, red pepper, and garlic; sauté 2 minutes. Add lentils; cook 1 minute. Remove from heat.
- Add water to a large skillet, filling two-thirds full; bring to a boil. Reduce heat; simmer. Add vinegar to pan. Break eggs into custard cups. Gently pour eggs into pan; cook 3 minutes or until desired degree of doneness. Carefully remove eggs from pan using a slotted spoon. Place about 3/4 cup lentil mixture on each of 4 plates; top each serving with 1 poached egg. Sprinkle evenly with remaining 1/4 teaspoon salt and black pepper. Top each serving with 1 tablespoon yogurt and 1 1/2 teaspoons cilantro.

This recipe came from Cooking Light magazine. It’s a perfect addition to a fall meal. It brightens up the plate and has a great flavor.
All of the herbs came from my garden. However, the cilantro was special. A few months ago in the heat of summer, I was frustrated that my cilantro kept bolting. I decided to let it flower and turn to seed so I could make my very own coriander seed. Once the plants got to the right point (for us, the right point was when we were sick of the constant swarm of bees who adored our cilantro flowers), I cut and then dried the plants in a paper bag. Then, I hung the bag inside for a few weeks. After a few weeks, I gave the bag a few shakes. Amazingly, there were some coriander seeds at the bottom of my bag. However, the yield was less than I hoped for: just a few tablespoons. I think I should have waited a bit longer to chop down the flowering cilantro before letting it dry.
Rather than save the coriander, I continued on with my experiment. I planted the coriander a few inches deep in the empty pot that used to house the cilantro. A few week later….little baby cilantro plants started popping up. I watered them gently at first. A few weeks later than that…carrot salad with a hit of heat features my very own “circle of life” cilantro. I know this is basic stuff to some people, but I was amazed that this process actually works.
Ingredients:
- 3 tablespoons extra-virgin olive oil
- 1 tablespoon fresh lemon juice
- 1 teaspoon sambal oelek (ground fresh chile paste)
- 4 cups coarsely grated carrot (about 1 pound)
- 3/8 teaspoon kosher salt
- 2 tablespoons chopped fresh cilantro
- 1 tablespoon minced fresh mint
- 1 tablespoon minced fresh chives (optional)
Directions:
- Combine first 3 ingredients in a large bowl, stirring with a whisk. Add carrot and salt; toss to coat. Let stand 30 minutes. Just before serving, add cilantro, mint, and chives, if desired; toss to combine.

Cue the old school Zelda theme song, because I’m on a quest: make a canning salsa that is spicy enough for my husband to enjoy the heat all winter long. This recipe came from the Food Channel. The result is a salsa with a decent amount of spice (but my quest is not over yet). I know that I can just add some habaneros for some serious heat, and that would be great for a salsa to stick in the fridge and eat within the week. However, whenever I want to put tomatoes in the cabinet for a year, I am wary of playing with the ingredients. That’s because I know that it has to have the correct level of acidity, etc. in order to avoid spoiling the food. Does anyone out there know of a tested recipe for a spicy canning tomato salsa? I think there are a still a few weeks left of tomato season, and I would like to give it one more try.
That being said, this salsa is fairly easy and pretty delicious. Adjust the number of jalapeños, or take out some seeds if that’s your preference. This recipe could also use a bit more salt, but I would taste it first and decide what you want to do. These tomatoes came from a farm stand in Amagansett, and the jalapeños came from the rooftop garden.
One more note: My makeshift canner holds 4 pint jars at a time. I only processed 4 jars and put the other two directly in the fridge. Then when I noticed how the salsa wasn’t salty, I started to doubt that it would stay good in the cabinet. The next day, I noticed some air bubbles in a few of the jars, so I decided put three more in the fridge. I didn’t want to take any chances. I only have one jar left in the cabinet. I will open that one in a few months and let you know if it worked.
For more information about canning, you can check out my other experiments:
Peach Salsa (this one has details about how to can)
Ingredients:
- 6 pounds of tomatoes
- 10 jalapeños, chopped (seeds included)
- 1/3 cup chopped fresh cilantro
- 9 cloves of garlic, chopped
- 1/3 cup lime juice
- 1 1/2 teaspoon salt
- 1 1/2 teaspoon cumin
- 3 onions (preferably 1 white, 1 yellow, 1 red)
- 6 pint jars (either small mouth or wide mouth is fine)
- Lids and rings
- Water bath with rack
- Sterilize jars and seals. (I did this by putting them in my dishwasher which gets super hot. Some dishwashers have a sterilize cycle, and that would work, too.)
- Start heating up your water for your water bath, if canning
- Put clean tomatoes in boiling water for 30-45 seconds, and then plunge them into ice water. The tomatoes will be easy to peel as a result.
- Peel tomatoes and cut out cores or bad spots. Chop the tomatoes to desired size (they will cook down so leave them slightly larger than you want them to be in the salsa).
- Mix tomatoes, garlic, lime juice, salt, and cumin and bring to a boil.
- Add onion, peppers, and cilantro. Bring to a boil and then simmer for 7-10 minutes.
- Remove 1 cup of liquid (to thicken the salsa).
- Put salsa in sterilized jars leaving 1/2 inch of headroom. (Stop here and put lids on if you are not canning)
- I did not do this, but I will next time: Use a chopstick or knife to slide around the jar to get rid of air bubbles.
- Wipe the rim of the jar, place sterilized seal on jar, and tighten the ring.
- Place jars in water bath for 15 minutes (time depends on altitude – more time for higher altitudes).
- Remove jars and let stand for at least 24 hours. Remove rings (optional) and store. If the jar did not seal, place it in refrigerator and use within a week.

My parents went out east to go for a bike ride. They came back with a bushel of corn. Apparently it was a bargain. As a result, I got a fridge full of corn! (Yes, you are supposed to refrigerate corn if you are not going to use it that day.)
What to do with the surplus of corn? I wanted to make a corn chowder that didn’t require me to drink a cup of heavy cream. Enter coconut milk. This chowder would go really well with a side of basmati rice. This recipe comes from The Food Network’s site.
Ingredients:
- 4 ears corn
- 2 cups diced red-skinned potatoes (about 12 ounces)
- 3/4 cup chopped scallions
- 2 tablespoons grated peeled fresh ginger
- 4 cloves garlic, smashed
- 8 black peppercorns
- 1 stalk lemongrass, cut into thirds (optional)
- 4 tablespoons unsalted butter
- Kosher salt
- 1 red jalapeno pepper, seeded and minced ( I used green jalapeño–keep the seeds in if you want some more heat)
- 1 13.5-ounce can coconut milk (I used the light version)
- 8 fresh basil leaves
- 8 fresh mint leaves
- 4 radishes, thinly sliced
- 1/4 cup roughly chopped fresh cilantro
- Juice of 1/2 lime, plus lime wedges for garnish
- 1 tomato, seeded and diced
Directions
- Cut off the corn kernels; set aside. Combine the cobs, 1 cup potatoes, 1/2 cup scallions, 1 tablespoon ginger, the garlic, peppercorns and 5 cups water in a pot. Smash the lemongrass, if using, and add to the pot. Bring to a boil, then simmer for 25 to 30 minutes.
- About 10 minutes before the broth is finished, melt the butter over medium-high heat in a separate pot. Add the remaining 1 cup potatoes, season with salt and cook until slightly soft, 5 minutes. Add the remaining 1 tablespoon ginger and the jalapeño; cook 1 minute. Add the corn kernels; cook until the vegetables are just tender, 3 to 4 minutes.
- Strain the broth, pressing out as much liquid as possible; discard the solids. Add 2 cups of the strained broth to the potatoes and corn; bring to a boil, cover and simmer for 10 minutes. Add the coconut milk, basil and mint; season with salt. Stir until simmering. Remove from the heat and add the radishes, cilantro and lime juice. Top with diced tomato and the remaining 1/4 cup scallions and serve with lime wedges.

Here is a fresh salsa recipe starring ingredients from my rooftop garden! I used Better Bush tomatoes (Bonnie) which are good for containers. The jalapeños that we’ve been growing are varying in their heat factor. My husband has the job of tasting the spiciest part of the jalapeño: I cut off a small slice closest to the stem and keep the seeds in it. That’s the part he tastes. Then, he rates them on a scale of 1-10; 10 being a very spicy jalapeño, 1 being no spice. This happens before I add the pepper to recipes so I can decide how much to add. This one was a 4. I still have not figured out why some are hotter than others, but I’m glad to have a spice tester nearby.
Right now, there are a bunch of green tomatoes and baby jalapeños on the plants, so there is definitely going to be more experiments with salsa in a few weeks! Do you have a favorite salsa recipe? Maybe you like to add peaches, corn, or black beans to yours? Please send it along!
Ingredients:
- 2 tomatoes, chopped
- 1 jalapeño pepper (remove seeds if you want less heat), minced
- 1 clove garlic, minced
- 1-2 tablespoons onion, minced (red or white)
- 2 tablespoons cilantro, minced
- juice of 1/2 lime
Directions:
Combine all ingredients. Refrigerate for a few hours before serving.

That is not a typo. This is Mexican Street Corn made with Indiana Sweet Corn. I had my first Mexican grilled street corn in Red Hook by the ball fields several years ago, and now I’m hooked. Clearly not the healthiest of side dishes, it went really well with a lighter grilled tequila lime Amish chicken breasts. (Let me know if you want that Barefoot Contessa recipe)
To make it into a much-less-messy-salad-version, just follow all the directions below and then cut the corn off the cob once it is cool enough to handle. Otherwise be sure to have lots of napkins nearby.
This recipe comes from Cook’s Illustrated’s Summer Grilling 2011 issue.
Ingredients
- vegetable oil for cooking grate
- 1/4 cup regular or light mayonaise
- 3 tablespoons sour cream
- 3 tablespoons minced fresh cilantro leaves
- 1 medium garlic clove, minced
- 3/4 teaspoon chili powder
- 1/4 teaspoon ground black pepper
- 1/4 teaspoon cayenne pepper (optional)
- 4 teaspoons juice from 1 lime
- 1 ounce queso fresco or Cotija cheese , crumbled
- 4 teaspoons vegetable oil
- 1/2 teaspoon kosher salt or 1/4 teaspoon table salt
- 6 large ears corn, husks and silk removed
Directions
- Turn all gas grill burners to high and heat grill with lid down until very hot, about 15 minutes. Scrape and oil grate (Dip wad of paper towels in vegetable oil; holding wad with tongs, wipe cooking grate.)
- While grill is heating, combine mayonaise, sour cream, cilantro, garlic, 1/4 teaspoon chili powder, black pepper, cayenne, lime juice, and cheese in large bowl; set aside.
- In a small bowl, combine oil, salt, and remaining 1/2 teaspoon chili powder. Brush the oil mixture onto the corn.
- Grill corn over high heat, turning occasionally, until lightly charred on all sides, 7 to 12 minutes total. Remove from grill and place in bowl with mayonaise mixture; toss to coat evenly. Serve immediately.

Are you familiar with Whole Foods’ Step System for animal welfare ratings? If you haven’t already heard me or someone else going on and on about it, here’s the link. What’s tricky is that they don’t have all of their cuts available in all levels at all times, so one has to be flexible. I’m still too new at buying meat to know about good substitutions, but I’m slowly learning. I went to get flank steak, as this Cooking Light recipe called for, but they did not have any steps 4-5 of that kind. The butcher suggested skirt steak, which they had in a Level 4. Great! Thanks, helpful butcher! I ended up bringing home entirely too much steak because I got flustered ordering it, and froze half for fajitas another night.
Also, this recipe calls for fish sauce. So do most Thai recipes that I find. Since I don’t eat fish, I just omitted it. However, when I took a Thai cooking class, I was told you can substitute “this mushroom sauce” for the fish sauce. However, I was in Thailand at the time and could not read the label on “this mushroom sauce.” Oh well. I should look for it in an Asian market one of these days. In the meantime, I usually just taste my food and add more soy sauce if I think it needs more salty flavor.
This gave me a chance to use some of my fresh herbs: mint, basil, and cilantro.
Ingredients
- Cooking spray
- 1 pound skirt steak
- 1/2 teaspoon freshly ground black pepper
- 1/4 teaspoon kosher salt
- 1/4 cup fresh lime juice
- 1 tablespoon brown sugar
- 2 tablespoons soy sauce
- 2 teaspoons minced fresh garlic
- 1 teaspoon Sriracha (hot chile sauce, such as Huy Fong)
- 1 1/2 cups thinly sliced red cabbage
- 3/4 cup julienne-cut carrots
- 1/3 cup fresh mint leaves
- 1/3 cup fresh cilantro leaves
- 1/3 cup fresh basil leaves
Directions:
- Heat a large grill pan over medium-high heat. Coat pan with cooking spray. Sprinkle steak evenly with pepper and salt. Add steak to pan; cook 6 minutes each side or until desired degree of doneness. Remove steak from pan; let stand 5 minutes. Cut steak diagonally across grain into thin slices.
- Combine juice and next 4 ingredients (through Sriracha) in a small bowl; stir with a whisk.
- Combine cabbage and remaining ingredients in a medium bowl. Add 6 tablespoons juice mixture to cabbage mixture; toss well. Toss steak in remaining 2 tablespoons juice mixture. Add steak to cabbage mixture; toss to combine.
