
It was a cool day at the lake today, so we headed to The Berry Patch in Etna Green, Indiana for blueberry picking. This jam became the perfect highlight of this colorfully festive blueberry and ricotta crostini which can be made in less than 30 minutes from beginning to end. Add a strawberry or raspberry for an additional color and you have a perfect snacketizer for the 4th of July.
Ingredients: (this makes about 3/4 cups jam when cooked)
2 cups blueberries
1/2 cup sugar
1/2 T lemon juice
Heat all ingredients in a saucepan over medium heat, stirring frequently until thickened. You know its ready when is starts to stick to the spoon and your toddler is screaming that he wants some NOW!
For the crostini, simply broil some slices of french bread in the oven. Then get creative with decorating with ricotta cheese, blueberry jam, and your red berry of choice.

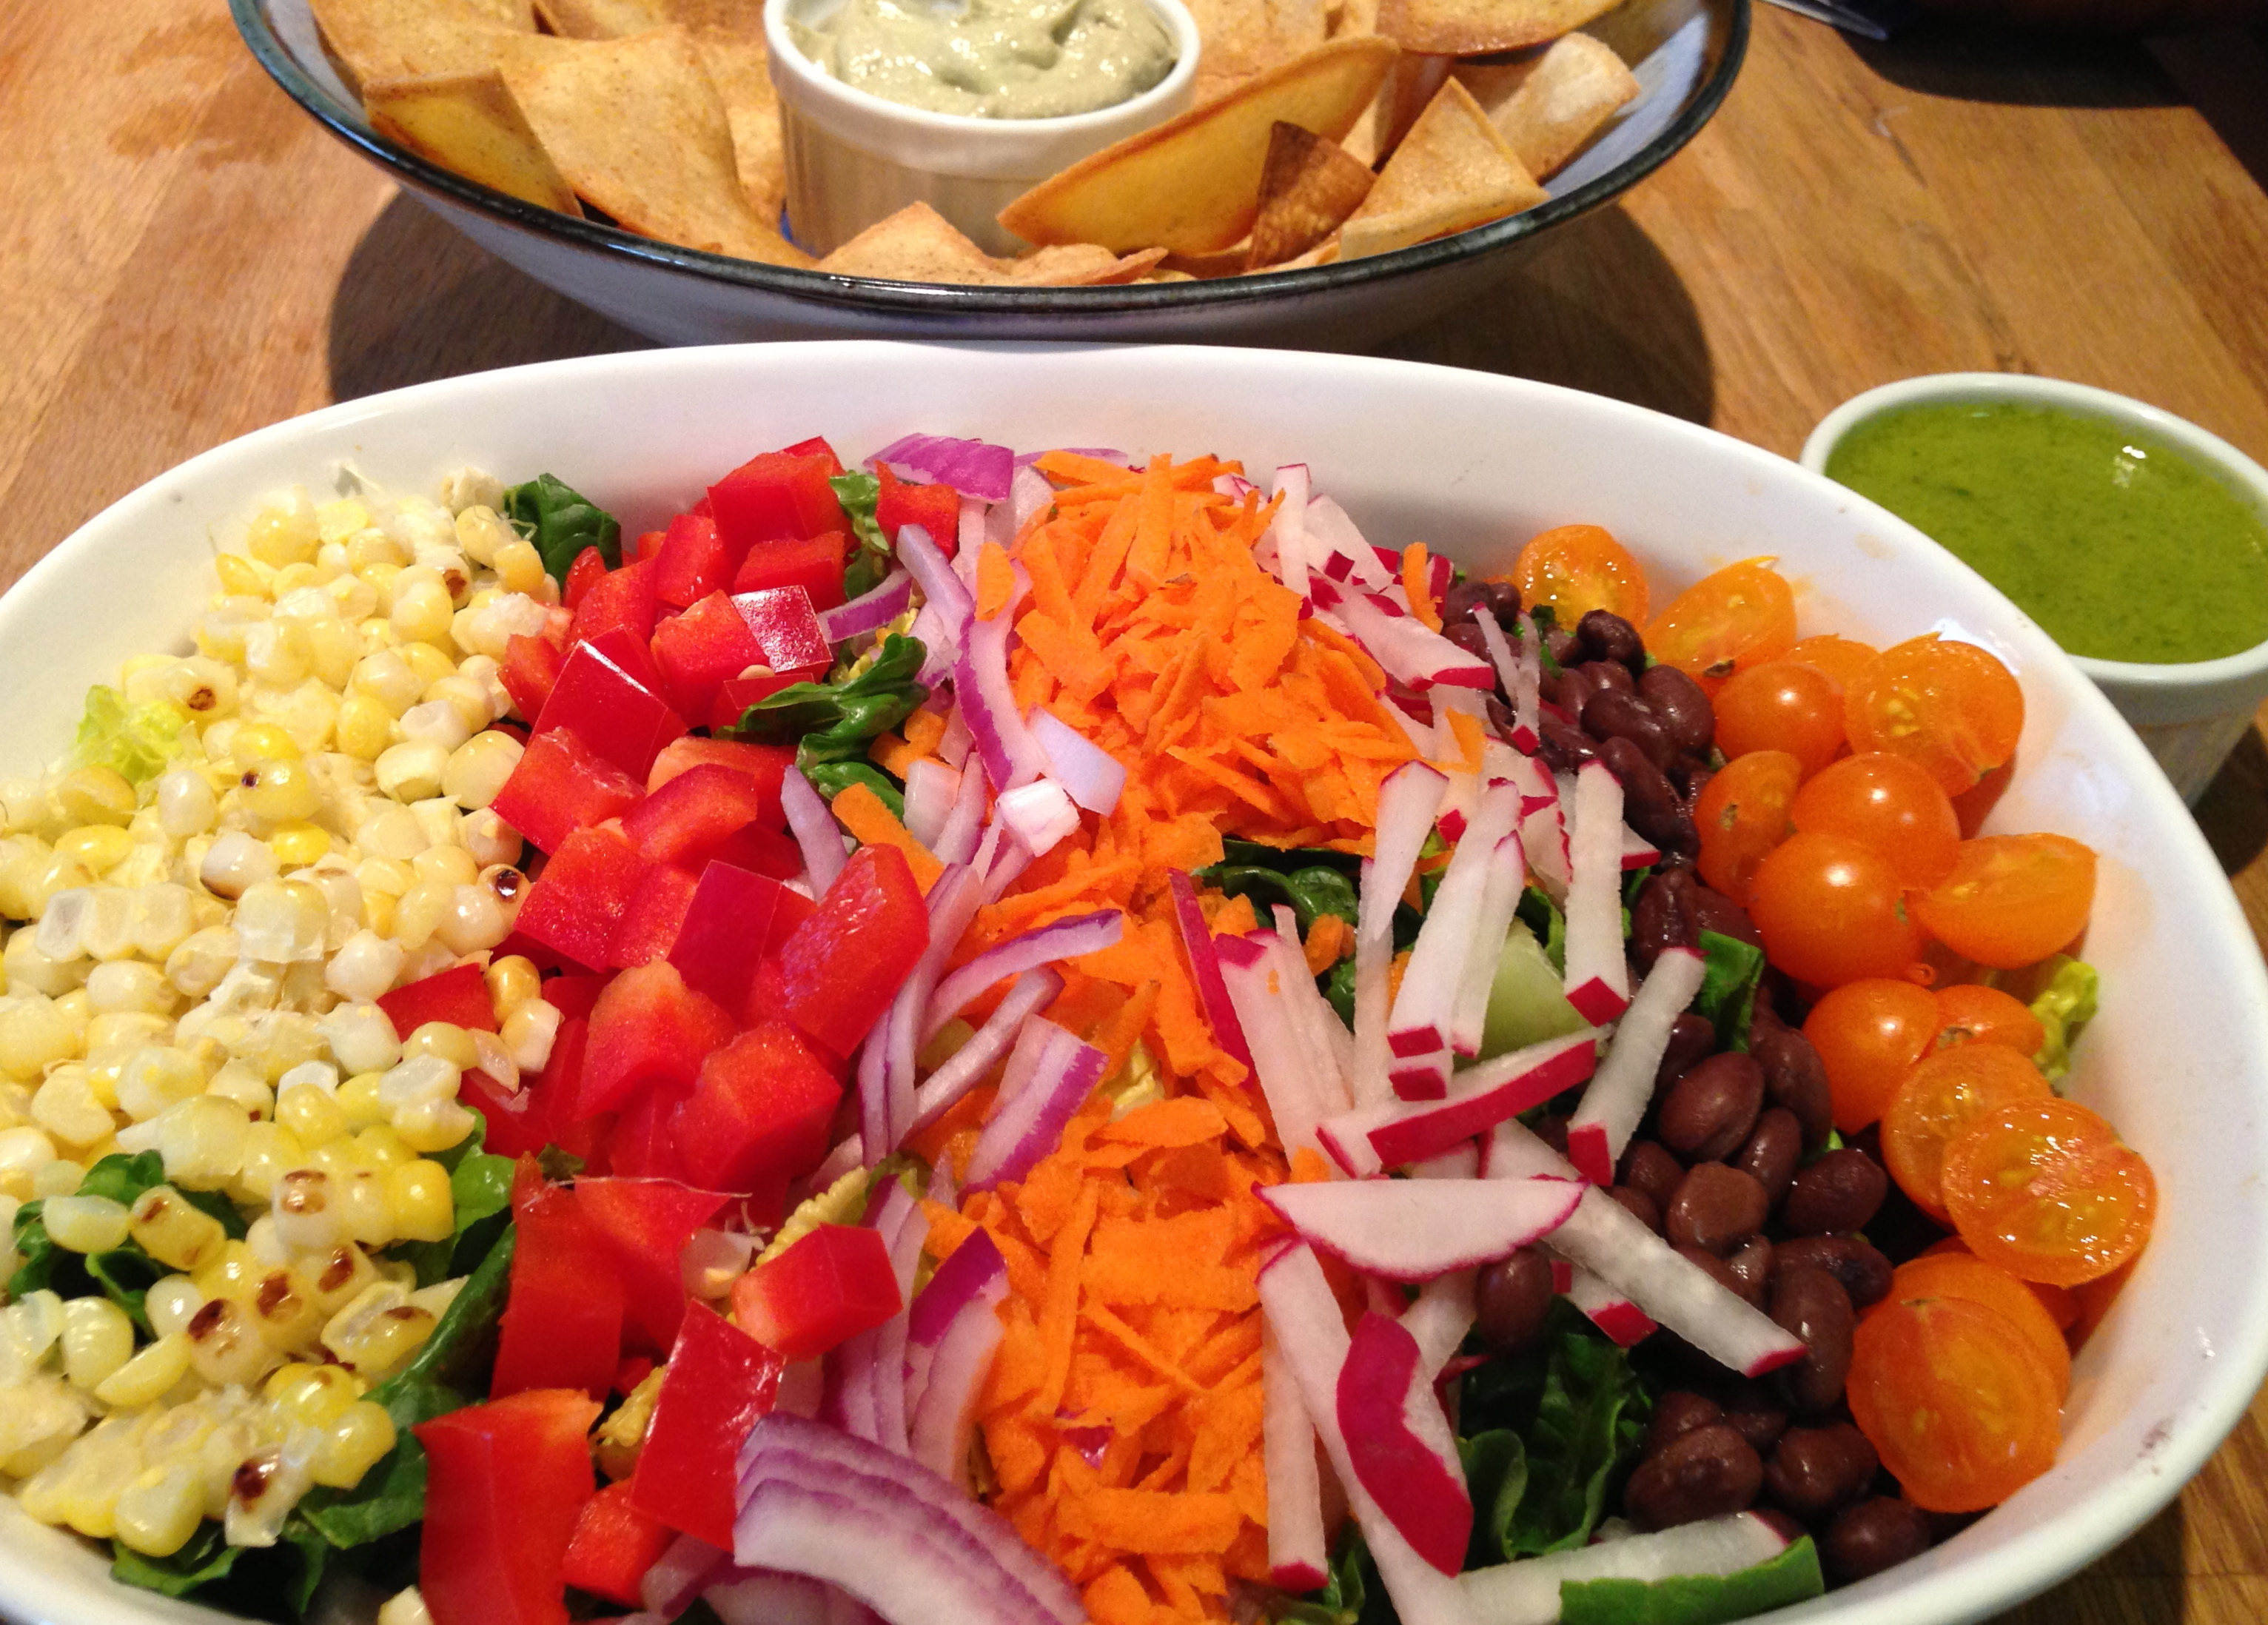
This post features a bunch of recipes. Not only is there the salad and dressing, but I also want to share this simple way to make baked chips. I served it with leftover vegan cashew avocado “cream” from these incredible tofu tacos I discovered on Love and Lemons.
To make the salad (I measured nothing):
Put some chopped romaine lettuce in a bowl.
Top with the following: I chose to do it cobb-salad style, but you can toss it all together, too. Go loco.
- radishes
- cherry tomatoes
- grilled corn (Soak it first for about a half an hour. Grill on medium-high for about 10 minutes, rotating a few times. Then, let it cool and cut it off the cob)
- shredded carrots
- chopped red bell peppers
- thinly sliced red onions
- drained black beans
- optional: shredded cheddar cheese
- You can also do: avocado, jicama, etc.
Basic cilantro-lime dressing:
Blend the following until smooth:
- 2 handfuls of cilantro
- juice of 2 limes
- a little bit of honey (or agave or sweetener of your choice)
- salt/pepper
- a few tablespoons of olive oil
- water to thin out as needed
For the chips:
- Preheat oven to 350 degrees
- Prepare oil: Mix together a few tablespoons of olive oil with spices of your choice. I did a few shakes of cumin and paprika, and then a few pinches of salt.
- Put a stack of corn tortillas on a cutting board and cut them into sixths (first cut in half and then cut each half into thirds)
- Arrange tortilla triangles in a single layer on a cookie sheet (no overlapping) and brush both sides with the oil mixture. Bake for 20-25 minutes, or until slightly brown and crispy.
- Serve with salad and dip of choice.

Trade in your green beer for a green smoothie this St. Patrick’s Day!
I was a skeptic of drinking my greens until recently, and now I’m hooked. For the fellow skeptics, start with just a few greens and then slowly add more each time. We’ve been aiming for a ratio of half vegetables and half fruits, with most of the vegetables being leafy greens. Many people ask, “Why smoothies instead of juice?” I have two main related reasons: less waste and easier clean-up. I like knowing that I’m getting all the nutritional benefits of the whole fruit and vegetable. Also, I hate cleaning up. The vitamix blender I use has a clean setting, so all I have to do is rinse out the soap at the end. Any variation of this smoothie makes for a very filling breakfast or snack.
Today’s smoothie included the following ingredients, many of which were available at this morning’s farmer’s market. It’s fun and healthy to vary the ingredients daily, and pretty much any combination is good.
Ingredients:
- 1 cup kale (assorted)
- 1/4 cup vitamin greens
- 1 carrot
- 1 green apple, peeled and cut into quarters
- 1/2 cup frozen peaches
- 1 banana, chopped
Directions:
- Blend 2 cups of water with the kale and vitamin greens until you have a gorgeous green water.
- Put the rest of the ingredients in the blender and blend until smooth.
- Drink right away, or put some in the fridge for later or the next day.

I love roasted butternut squash soup. This one stands out because of the other flavors involved: apples, hint of chili, rosemary, coriander, and of course cream. It’s also fairly easy because pretty much everything just roasts together for the same amount of time.
I altered this recipe from NPR, (which originally was a Jamie Oliver recipe) just a little bit. They suggested putting the pumpkin seeds in the oven alongside the vegetables for 10-15 minutes, but that resulted in black, smelly pumpkin seeds. Instead, I just toasted them on a skillet for a few minutes, stirring a few times to make sure they got evenly browned.
Ingredients:
- 1 butternut squash, about 2 pounds, peeled, seeded and cut into 1-inch chunks
- 3 firm, sweet apples, such as Braeburn, Pink Lady or Jazz, peeled, cored and quartered–I used Honeycrisp from the Grand Army Plaza farmer’s market
- 1 large onion, peeled and roughly chopped
- 1 fresh hot red chili, seeded and finely chopped
- 4 cloves of garlic, unpeeled and crushed
- 1 teaspoon kosher salt
- 1 teaspoon freshly ground black pepper
- 1/2 teaspoon coriander seeds
- 2 teaspoons finely chopped fresh rosemary
- 1/4 cup olive oil plus 1 teaspoon olive oil, separated
- 1/4 cup pumpkin seeds (the shelled kernels, sometimes called pepitas)
- 3 1/4 cups vegetable or chicken stock
- 2/3 cup light cream–I used a combination of half and half and heavy cream, and you can probably get away with less cream if you want to keep it light.
- Pumpkin seed oil, for garnish(I did not use this)
Directions:
- Preheat oven to 400 degrees.
- Spread the squash, apples, onion, chili and garlic on a baking sheet. Sprinkle with the salt, pepper, coriander and rosemary. Drizzle with 1/4 cup olive oil and toss until well coated. Roast for 45 minutes to 1 hour, or until all the vegetables are cooked through and golden.
- Heat a skillet to medium-low, and toast pumpkin seeds, tossing occasionally, until evenly browned–about 5-10 minutes.
- Remove the vegetables from the oven. When they are cool enough to handle, squeeze the garlic from the peel. If you have an immersion blender, scrape the vegetables into a large pot. Deglaze the baking sheet with 1/4 cup boiling water, scraping at the burned-on bits to capture them. Add the water to the pot. Add the stock to the pot and puree, using the immersion blender.
- If you are using a countertop blender, deglaze the pan as above and pour into the blender. Add roughly 1/3 of the vegetables from the baking sheet and puree. Transfer puree to a large pot. Continue this process with the rest of the vegetables, using the stock.
- Once the vegetables are pureed in the pot, add the cream and bring to a simmer over medium-low heat. Simmer until the soup is warmed through and reaches your preferred consistency.
- To serve, divide into bowls. Drizzle with pumpkin seed oil (or not). Top with toasted pumpkin seeds.

This recipe came from Cooking Light magazine. It’s a perfect addition to a fall meal. It brightens up the plate and has a great flavor.
All of the herbs came from my garden. However, the cilantro was special. A few months ago in the heat of summer, I was frustrated that my cilantro kept bolting. I decided to let it flower and turn to seed so I could make my very own coriander seed. Once the plants got to the right point (for us, the right point was when we were sick of the constant swarm of bees who adored our cilantro flowers), I cut and then dried the plants in a paper bag. Then, I hung the bag inside for a few weeks. After a few weeks, I gave the bag a few shakes. Amazingly, there were some coriander seeds at the bottom of my bag. However, the yield was less than I hoped for: just a few tablespoons. I think I should have waited a bit longer to chop down the flowering cilantro before letting it dry.
Rather than save the coriander, I continued on with my experiment. I planted the coriander a few inches deep in the empty pot that used to house the cilantro. A few week later….little baby cilantro plants started popping up. I watered them gently at first. A few weeks later than that…carrot salad with a hit of heat features my very own “circle of life” cilantro. I know this is basic stuff to some people, but I was amazed that this process actually works.
Ingredients:
- 3 tablespoons extra-virgin olive oil
- 1 tablespoon fresh lemon juice
- 1 teaspoon sambal oelek (ground fresh chile paste)
- 4 cups coarsely grated carrot (about 1 pound)
- 3/8 teaspoon kosher salt
- 2 tablespoons chopped fresh cilantro
- 1 tablespoon minced fresh mint
- 1 tablespoon minced fresh chives (optional)
Directions:
- Combine first 3 ingredients in a large bowl, stirring with a whisk. Add carrot and salt; toss to coat. Let stand 30 minutes. Just before serving, add cilantro, mint, and chives, if desired; toss to combine.

This soup is smoky and spicy. (To turn down the heat, use less chipotle chili powder). You can make a meal of it by serving it with a crusty bread and a green salad. I found the recipe in Williams Sonoma’s catalog. It is called, “Sussman Brothers’ Roasted Corn Soup with Tomato.” I did a little research and learned that Eli and Max Sussman are the chefs at Mile End and Roberta’s, two of my favorite restaurants in Brooklyn. It is no surprise that this recipe was a winner. I had never cooked a red pepper as described in this recipe. I was doubtful, but it turned out well.
Ingredients:
- 2 ripe but firm tomatoes
- Kernels from 6 ears of fresh corn (about 3 cups)
- 2 red bell peppers
- 1 yellow onion, chopped
- 1 red onion, chopped
- 3 garlic cloves, minced
- About 2 1/2 cups low-sodium chicken broth, plus more as needed
- 1 tsp. chipotle chili powder
- 2 Tbs. salt
- 1 cup heavy cream
- Sliced avocado for garnish
- Extra-virgin olive oil for drizzling
- Paprika for garnish
Directions:
- Preheat an oven to 375°.
- Put the tomatoes in a lightly greased glass baking dish. Roast until the skins darken and the tomatoes are caramelized, about 30 minutes. Remove from the oven and let cool. Keep the oven on.
- Spread the corn in a single layer on a baking sheet. Roast until the edges begin to turn golden brown, 10 to 15 minutes. Meanwhile, when the tomatoes are cool enough to handle, peel off the skins and discard. Set the flesh, with the juices, aside in the baking dish. Remove the corn from the oven and let cool.
- Place 1 bell pepper on each of 2 gas burners. Turn the burners on high and sear the peppers directly over the flame, using tongs to turn as needed, until the skins are blackened all over, 10 to 15 minutes total. (Or place the peppers under the broiler and broil, turning as needed, until charred and blistered on all sides, about 15 minutes.) Transfer the peppers to a brown paper bag and close tightly. Let stand for 15 minutes, then remove the peppers from the bag. Remove and discard the skins, core and seeds.
- In a soup pot, combine the tomatoes, bell peppers, yellow and red onions, garlic and corn, reserving a handful of the roasted corn for garnish. Add just enough broth to cover the vegetables and bring to a boil over high heat. Reduce the heat to medium-high and cook until the vegetables are very tender, about 10 minutes. Stir in the chili powder and salt.
- Using an immersion blender, blend the soup until smooth. While blending, slowly drizzle in the cream. Ladle the soup into individual bowls. Garnish each portion with a couple of avocado slices, a few drops of olive oil, a scattering of the reserved roasted corn and a sprinkle of paprika. Serve hot. Serves 4.

Cue the old school Zelda theme song, because I’m on a quest: make a canning salsa that is spicy enough for my husband to enjoy the heat all winter long. This recipe came from the Food Channel. The result is a salsa with a decent amount of spice (but my quest is not over yet). I know that I can just add some habaneros for some serious heat, and that would be great for a salsa to stick in the fridge and eat within the week. However, whenever I want to put tomatoes in the cabinet for a year, I am wary of playing with the ingredients. That’s because I know that it has to have the correct level of acidity, etc. in order to avoid spoiling the food. Does anyone out there know of a tested recipe for a spicy canning tomato salsa? I think there are a still a few weeks left of tomato season, and I would like to give it one more try.
That being said, this salsa is fairly easy and pretty delicious. Adjust the number of jalapeños, or take out some seeds if that’s your preference. This recipe could also use a bit more salt, but I would taste it first and decide what you want to do. These tomatoes came from a farm stand in Amagansett, and the jalapeños came from the rooftop garden.
One more note: My makeshift canner holds 4 pint jars at a time. I only processed 4 jars and put the other two directly in the fridge. Then when I noticed how the salsa wasn’t salty, I started to doubt that it would stay good in the cabinet. The next day, I noticed some air bubbles in a few of the jars, so I decided put three more in the fridge. I didn’t want to take any chances. I only have one jar left in the cabinet. I will open that one in a few months and let you know if it worked.
For more information about canning, you can check out my other experiments:
Peach Salsa (this one has details about how to can)
Ingredients:
- 6 pounds of tomatoes
- 10 jalapeños, chopped (seeds included)
- 1/3 cup chopped fresh cilantro
- 9 cloves of garlic, chopped
- 1/3 cup lime juice
- 1 1/2 teaspoon salt
- 1 1/2 teaspoon cumin
- 3 onions (preferably 1 white, 1 yellow, 1 red)
- 6 pint jars (either small mouth or wide mouth is fine)
- Lids and rings
- Water bath with rack
- Sterilize jars and seals. (I did this by putting them in my dishwasher which gets super hot. Some dishwashers have a sterilize cycle, and that would work, too.)
- Start heating up your water for your water bath, if canning
- Put clean tomatoes in boiling water for 30-45 seconds, and then plunge them into ice water. The tomatoes will be easy to peel as a result.
- Peel tomatoes and cut out cores or bad spots. Chop the tomatoes to desired size (they will cook down so leave them slightly larger than you want them to be in the salsa).
- Mix tomatoes, garlic, lime juice, salt, and cumin and bring to a boil.
- Add onion, peppers, and cilantro. Bring to a boil and then simmer for 7-10 minutes.
- Remove 1 cup of liquid (to thicken the salsa).
- Put salsa in sterilized jars leaving 1/2 inch of headroom. (Stop here and put lids on if you are not canning)
- I did not do this, but I will next time: Use a chopstick or knife to slide around the jar to get rid of air bubbles.
- Wipe the rim of the jar, place sterilized seal on jar, and tighten the ring.
- Place jars in water bath for 15 minutes (time depends on altitude – more time for higher altitudes).
- Remove jars and let stand for at least 24 hours. Remove rings (optional) and store. If the jar did not seal, place it in refrigerator and use within a week.

This is a basic tabbouleh recipe that does not require a lot of ingredients. If you are looking for more of a meal, check out my tabbouleh with chicken and tahini recipe here. This week, we got a lot of parsley from the CSA, and tabbouleh is my favorite way to use it all up. Thanks to Simply Recipes for the original recipe. I revised the amounts when I made it myself. Feel free to increase the herbs and decrease the bulgur or the other way around, depending on the ratio you prefer. (I like more herbs when eating it with pita, more bulgur when eating it as a stand-alone salad). Do you have another favorite recipe that highlights parsley? Send it along!
Ingredients:
- 1 cup water
- 1 teaspoon salt
- 1 cup bulgur wheat
- 1/4 cup olive oil
- Juice from 2 lemons
- 5-6 Roma or plum tomatoes, seeded and chopped (I used about a cup of mixed tomatoes, including cherry tomatoes–but I left the seeds in the little guys)
- 2 scallions, chopped, including the greens
- 1 1/2-2 cups parsley, chopped
- 3/4 cup fresh mint leaves, chopped
Directions:
- Place the bulgur in a medium sized bowl. Bring water and the teaspoon of salt to a boil, pour it over the bulgur. Let sit for 30 minutes.
- In a large bowl, add the olive oil, lemon juice, bulgur and mix well. Add in all the other ingredients and mix to combine.
- Taste the tabbouleh, and add more salt, olive oil or more lemon juice to taste. Let marinate for at least 30 minutes before serving. Will keep chilled for several days.

These are like little salads you can eat with your hands. You can really improvise and use whatever vegetables you have on hand. Also, you can add shrimp, chicken, or tofu to these for some more protein. However, I liked them nice and light for these hot summer days. You may have to go to a larger store or an Asian market to get the rice paper wrap. The 3rd store was a charm for me–I picked some at at Pacific Green on Court Street in Cobble Hill. As a bonus, I also picked up some of their wonderfully fresh-cut watermelon for dessert.
These fresh summer rolls (as opposed to deep-fried spring rolls) are great to bring to a picnic or anywhere else. Just put a layer of damp paper towels on the bottom, seal them tightly with saran wrap, and they should be good to go a day in advance. If you want to store them in layers, put a layer of paper towels between the layers of rolls to keep them from sticking to each other.
The quantity of the ingredients list is flexible. It depends on your preference: you can make each roll with as much of each ingredient as you choose. One cucumber and one carrot will be good for about 8 rolls, which are each cut in half.
Ingredients:
For the rolls:
- 1 package very thin rice noodles, cooked according to package directions
- 1 cucumber, cut in half cross wise and then into thin strips
- 1 carrot, shaved with a vegetable peeler
- 4 radishes, cut into matchsticks (First cut the radish into thin slices. Then, cut each round slice into strips.)
- 20 or so whole basil leaves (fewer if your leaves are bigger)
- 20 or so whole cilantro leaves
- 20 or so whole mint leaves (fewer if your leaves are bigger)
- 1 package rice paper wrappers: they look like this
For the dipping sauce:
- 2 tablespoons peanut butter
- 2 tablespoons rice vinegar
- 2 tablespoons hoisin sauce
- 2 teaspoons soy sauce
- 2 teaspoons sugar
- 1/2 teaspoon red pepper flakes
- water as needed to thin out the sauce
- optional: one clove or garlic, minced
Directions:
- If you did not cook the noodles ahead of time already, get those going according to package directions.
- Prepare the dipping sauce: mix all ingredients together. Thin out with a few tablespoons or water at at time until you get your desired consistency. I added a bit more vinegar as well,so just taste and keep adjusting the amounts until you like the flavor.
- Fill a large sauté pan with warm water. Hopefully it is large enough for you to quickly dip the wrappers in without crushing them. The wrappers I got this time were HUGE (larger diameter than any of my pans) so I just dipped one half at a time. Here’s how it works: The wrapper needs to sit in warm water for a just a few seconds to become pliable so you can actually wrap with it. Then, you need to work fairly quickly but carefully so that you don’t tear the wrapper. Just do one at a time.
- After softening the wrapper, place it carefully on a work surface. Fill the middle with the goods: a small handful of noodles, a few cucumber sticks, a few radishes, a few carrots, a few of each: cilantro, basil, mint, whatever else you feel like.
- Then, get rolling. Fold the top and bottom up to close off the edges of your roll. Then, start wrapping from one side until you get the shape you want. You’ll need to be a little forceful with your vegetables to get them into roll-shape. Its ok, they can handle it.
- Cut each roll in half, and serve with dipping sauce on the side.
