elevating the status of the salad

Tag Archives: salsa

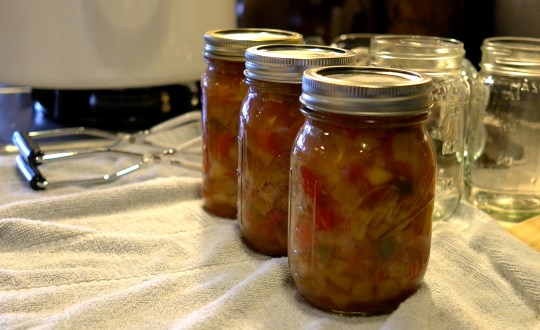
Cue the old school Zelda theme song, because I’m on a quest: make a canning salsa that is spicy enough for my husband to enjoy the heat all winter long. This recipe came from the Food Channel. The result is a salsa with a decent amount of spice (but my quest is not over yet). I know that I can just add some habaneros for some serious heat, and that would be great for a salsa to stick in the fridge and eat within the week. However, whenever I want to put tomatoes in the cabinet for a year, I am wary of playing with the ingredients. That’s because I know that it has to have the correct level of acidity, etc. in order to avoid spoiling the food. Does anyone out there know of a tested recipe for a spicy canning tomato salsa? I think there are a still a few weeks left of tomato season, and I would like to give it one more try.

That being said, this salsa is fairly easy and pretty delicious. Adjust the number of jalapeños, or take out some seeds if that’s your preference. This recipe could also use a bit more salt, but I would taste it first and decide what you want to do. These tomatoes came from a farm stand in Amagansett, and the jalapeños came from the rooftop garden.

One more note: My makeshift canner holds 4 pint jars at a time. I only processed 4 jars and put the other two directly in the fridge. Then when I noticed how the salsa wasn’t salty, I started to doubt that it would stay good in the cabinet. The next day, I noticed some air bubbles in a few of the jars, so I decided put three more in the fridge. I didn’t want to take any chances. I only have one jar left in the cabinet. I will open that one in a few months and let you know if it worked.

For more information about canning, you can check out my other experiments:

Peach Salsa (this one has details about how to can)

Applesauce

Jalapeño Jam

Pickled Green Beans

Strawberry Jam

Ingredients:

  • 6 pounds of tomatoes
  • 10 jalapeños, chopped (seeds included)
  • 1/3 cup chopped fresh cilantro
  • 9 cloves of garlic, chopped
  • 1/3 cup lime juice
  • 1 1/2 teaspoon salt
  • 1 1/2 teaspoon cumin
  • 3 onions (preferably 1 white, 1 yellow, 1 red)
  • 6 pint jars (either small mouth or wide mouth is fine)
  • Lids and rings
  • Water bath with rack
  1. Sterilize jars and seals. (I did this by putting them in my dishwasher which gets super hot. Some dishwashers have a sterilize cycle, and that would work, too.)
  2. Start heating up your water for your water bath, if canning
  3. Put clean tomatoes in boiling water for 30-45 seconds, and then plunge them into ice water. The tomatoes will be easy to peel as a result.
  4. Peel tomatoes and cut out cores or bad spots. Chop the tomatoes to desired size (they will cook down so leave them slightly larger than you want them to be in the salsa).
  5. Mix tomatoes, garlic, lime juice, salt, and cumin and bring to a boil.
  6. Add onion, peppers, and cilantro. Bring to a boil and then simmer for 7-10 minutes.
  7. Remove 1 cup of liquid (to thicken the salsa).
  8. Put salsa in sterilized jars leaving 1/2 inch of headroom. (Stop here and put lids on if you are not canning)
  9. I did not do this, but I will next time: Use a chopstick or knife to slide around the jar to get rid of air bubbles.
  10. Wipe the rim of the jar, place sterilized seal on jar, and tighten the ring.
  11. Place jars in water bath for 15 minutes (time depends on altitude – more time for higher altitudes).
  12. Remove jars and let stand for at least 24 hours. Remove rings (optional) and store. If the jar did not seal, place it in refrigerator and use within a week.


Image

Here is a fresh salsa recipe starring ingredients from my rooftop garden! I used Better Bush tomatoes (Bonnie) which are good for containers. The jalapeños that we’ve been growing are varying in their heat factor. My husband has the job of tasting the spiciest part of the jalapeño: I cut off a small slice closest to the stem and keep the seeds in it. That’s the part he tastes.  Then, he rates them on a scale of 1-10; 10 being a very spicy jalapeño, 1 being no spice. This happens before I add the pepper to recipes so I can decide how much to add. This one was a 4. I still have not figured out why some are hotter than others, but I’m glad to have a spice tester nearby. 

Right now, there are a bunch of green tomatoes and baby jalapeños on the plants, so there is definitely going to be more experiments with salsa in a few weeks! Do you have a favorite salsa recipe? Maybe you like to add peaches, corn, or black beans to yours? Please send it along!


Ingredients:

  • 2 tomatoes, chopped
  • 1 jalapeño pepper (remove seeds if you want less heat), minced
  • 1 clove garlic, minced
  • 1-2 tablespoons onion, minced (red or white)
  • 2 tablespoons cilantro, minced
  • juice of 1/2 lime

Directions:

Combine all ingredients. Refrigerate for a few hours before serving.


The peaches this year have been delicious, and my only complaint is that we cannot eat them all before they spoil. So, I opened up Sherri Brooks Vinton’s preserving book: Put ‘Em Up! and got to work. This week’s preserving projects were Peach Salsa and Peach Leather.

Peach Salsa

Note: If you are planning on canning the salsa, read the information at the bottom of the directions first, since you need to prepare your materials ahead of time. Canning can be a daunting project when working solo. I recommend canning in a small group to ease the stress and add to the fun. Canning is a great way to enjoy the bright flavors of summer in the dead of winter. If you plan on eating or sharing the salsa within a week, no need to can it. 

Ingredients

  • 3 pounds peaches
  • 1 cup cider vinegar
  • 1 cup brown sugar, lightly packed
  • 1 tablespoon ground cumin
  • 1 tablespoon salt
  • 1 pound tomatoes, cored, seeded, and diced
  • 1 red bell pepper, diced
  • 1 jalapeno pepper, diced
  • 1 red onion, diced
  • 1/4 cup minced fresh cilantro (which I went through the trouble of mincing and then forgot to add it before canning..oops!)

Directions

  1. Prepare an ice-water bath in a large bowl.
  2. Bring a large pot of water to a boil. Working in batches of 2 at a time, blanch the fruit in the boiling water for 30 seconds to loosen the skins.
  3. Scoop the peaches out of the water and plunge them into the ice-water bath. Repeat with the remaining peaches. Drain.
  4. Combine the vinegar, brown sugar, cumin and salt in a large nonreactive pot. Using a small paring knife, peel, pit, and dice the peaches, adding them to the pot as you go to prevent browning. Add the tomatoes, bell pepper, jalapeno, and onion, and bring to a boil. Reduce the heat and simmer until thickened, about 15 minutes. Add the cilantro (!) and remove from the heat.
  5. At this point, you can simply ladle the salsa into bowls or jars, and refrigerate for up to a week, covered. OR—You can CAN them so they can stay in the pantry for up to a year. Keep reading to find out how>>>

Canning the peach salsa:

You will need:

  • Canner (or large pot with layer of jar rings on the bottom, thread side down) Your container should be large enough that there is at least 2 inches of space above the height of the cans.
  • jars (I used 3 pint jars for this recipe, and there was some salsa leftover to eat right away. You can also use double the amount of half-pint jars, as they will require a shorter canner.) You will need extra jars to fill up the canner, so the cans do not tip while processing.
  • jar lifter
  • jar rings–you can reuse these; just make sure they are clean and free of rust
  • jar lids (may only be used once for canning)
  • canning funnel
  • bubble tool or chopstick
  • clean kitchen towels and several paper towels
  1. Right away, get the canner filled up with water–enough to cover the jars– and heat it up with the lid on. It will take a while to bring to a boil, and you want it to be ready while the salsa is still hot so you can do a hot fill.
  2. Run the jars in the dishwasher to ensure they will be clean and piping hot when the salsa is ready to go.
  3. Wash the lids and place them bottom-side down in a small heat-proof bowl. If you don’t have/don’t want to use a dishwasher, you can bring the jars to a boil in the canner once to get them nice and hot.
  4. Prepare the recipe as outlined above.
  5. Lay out a clean kitchen towel and have all our equipment nearby.
  6. Using the canning tongs, remove a jar from the canner, and carefully tip the hot water into the bowl with the jar lids so their sealing rings begin to soften. If your jars were in the dishwasher, just pout hot water over the lids–you can ladle some from the canner.
  7. Use the canning tongs to remove additional jars from the canner, emptying the water directly back into the canner and placing them, open side up, on a clean kitchen towel.
  8. Use the canning funnel to fill a jar with the hot salsa, leaving 1/2 inch of headspace.
  9. Release trapped air with your bubble tool or chopstick.
  10. Wipe the rim clean with a paper towel, center lids on the jars and screw on the ring until it is finger-tip tight (not knuckle!)
  11. Repeat steps 7-10 with remaining jars.
  12. Use the canning tongs to lift the filled jars (be careful not to tip them) and lower them into the canner, being sure they are covered by 2 inches of water.
  13. Cover the pot and bring the water to a rolling boil. Lower the heat a bit, so the water isn’t rolling out of the pot by still maintains a lot of rolling action. Start timing 15 minutes after the full boil is reached.
  14. After 15 minutes, turn off the heat and remove the lid from the canner.
  15. Let the jars cool in the canner for 5 minutes. This way they won’t spurt at you!
  16. After 5 minutes, use the canning tongs to lift the jars STRAIGHT out of the canner. Do not tip them!! Place them on a clean dish towel-covered counter.
  17. Let cool overnight. You will need to tighten the jars again. Store them in a cool, dark place for up to one year.

Here are some helpful resources on canning:

http://www.canningusa.com (detailed videos/tutorials)

http://sherribrooksvinton.com:  Sherri Brooks Vinton’s site

****************

Peach Leather

Ingredients:

  • 2 pounds peaches
  • 1 cup water
  • 2 tablespoons bottled lemon juice (I used freshly squeezed lemon juice, but that might explain my uneven results)
  • 1/4 cup sugar

Directions:

  1. Prepare an ice-water bath in a large bowl.
  2. Bring a large pot of water to a boil. Working in batches of 2 at a time, blanch the fruit in the boiling water for 30 seconds to loosen the skins.
  3. Scoop the peaches out of the water and plunge them into the ice-water bath. Repeat with the remaining peaches. Drain. Using a small paring knife, peel, pit, and roughly chop the peaches.
  4. Bring the peaches and 1 cup water to a boil in a medium nonreactive saucepan (I used stainless steel). Simmer until they begin to break down, about 5 minutes. Remove the fruit from the heat, let cool slightly, and puree with a traditional blender or stick blender, or by running it through a food mill.
  5. Preheat the oven to 170 degrees F. Line a jelly roll pan or a rimmed baking sheet with parchment paper or a silpat and set aside.
  6. Return the puree to the pot and simmer over low heat, stirring frequently, until it thickens to the consistency of baby food. Add the lemon juice and sugar and stir to dissolve.
  7. Spread the puree on the baking sheet, tilting it to create an even layer about 1/8 inch thick. Dry in the oven until tacky to the touch, about 2 hours. *
  8. Cool to room temperature. Slide the parchment onto a cutting board and roll the leather into a tube. Slice the tube into 2-inch segments and store in a covered jar for up to 1 month.

*My puree took much longer than 2 hours before it turned tacky, and when it did turn tacky it did so unevenly. Next time, I will try to spread it in a thinner layer, and make sure it is as even as possible. Also, I will try to use bottled lemon juice as this may have caused the problem, too.  I’d love to hear how yours comes out!