 Are you tired of sautéing or steaming your green beans? Well, the temperature finally dropped below 80 degrees, so now is a great time to make some soup.
This is a protein-packed vegan soup with a mild flavor and very few ingredients.
Thank you to Chocolate & Zucchini for this wonderful recipe, which I adapted only a little bit based on what I had in my fridge this morning!
Ingredients:
3 tablespoons olive oil
1 onions, peeled and chopped
1 garlic clove, peeled and smashed
12 baby carrots, sliced
About a pound of green beans, rinsed and trimmed
salt and pepper to taste
1 cup vegetable broth
3 cups water
1.5 cups sliced almonds
Directions:
- Heat the oil in a medium heavy-bottomed soup pot. Add the onions and carrots, and cook over medium heat, stirring every now and then, until softened and very lightly golden. Add the garlic and stir for minute. Add the green beans to the pot, season with salt and pepper, and cook for 5 minutes, stirring from time to time.
- Pour in the broth and water, bring to a simmer, cover, and cook for about 20 minutes, until all the vegetables are soft. In the meantime, pour the sliced almonds in a dry skillet. Set over medium-high heat and toast for about two minutes, stirring constantly and watching closely, until golden and fragrant. Set aside in a bowl to prevent overtoasting.
- When the vegetables are soft, add the almonds to the pot and stir well. Remove from heat and let cool slightly. Use a high powered or immersion blender to mix all ingredients until velvety smooth. Taste, adjust the seasoning, reheat over gentle heat if necessary, and serve.
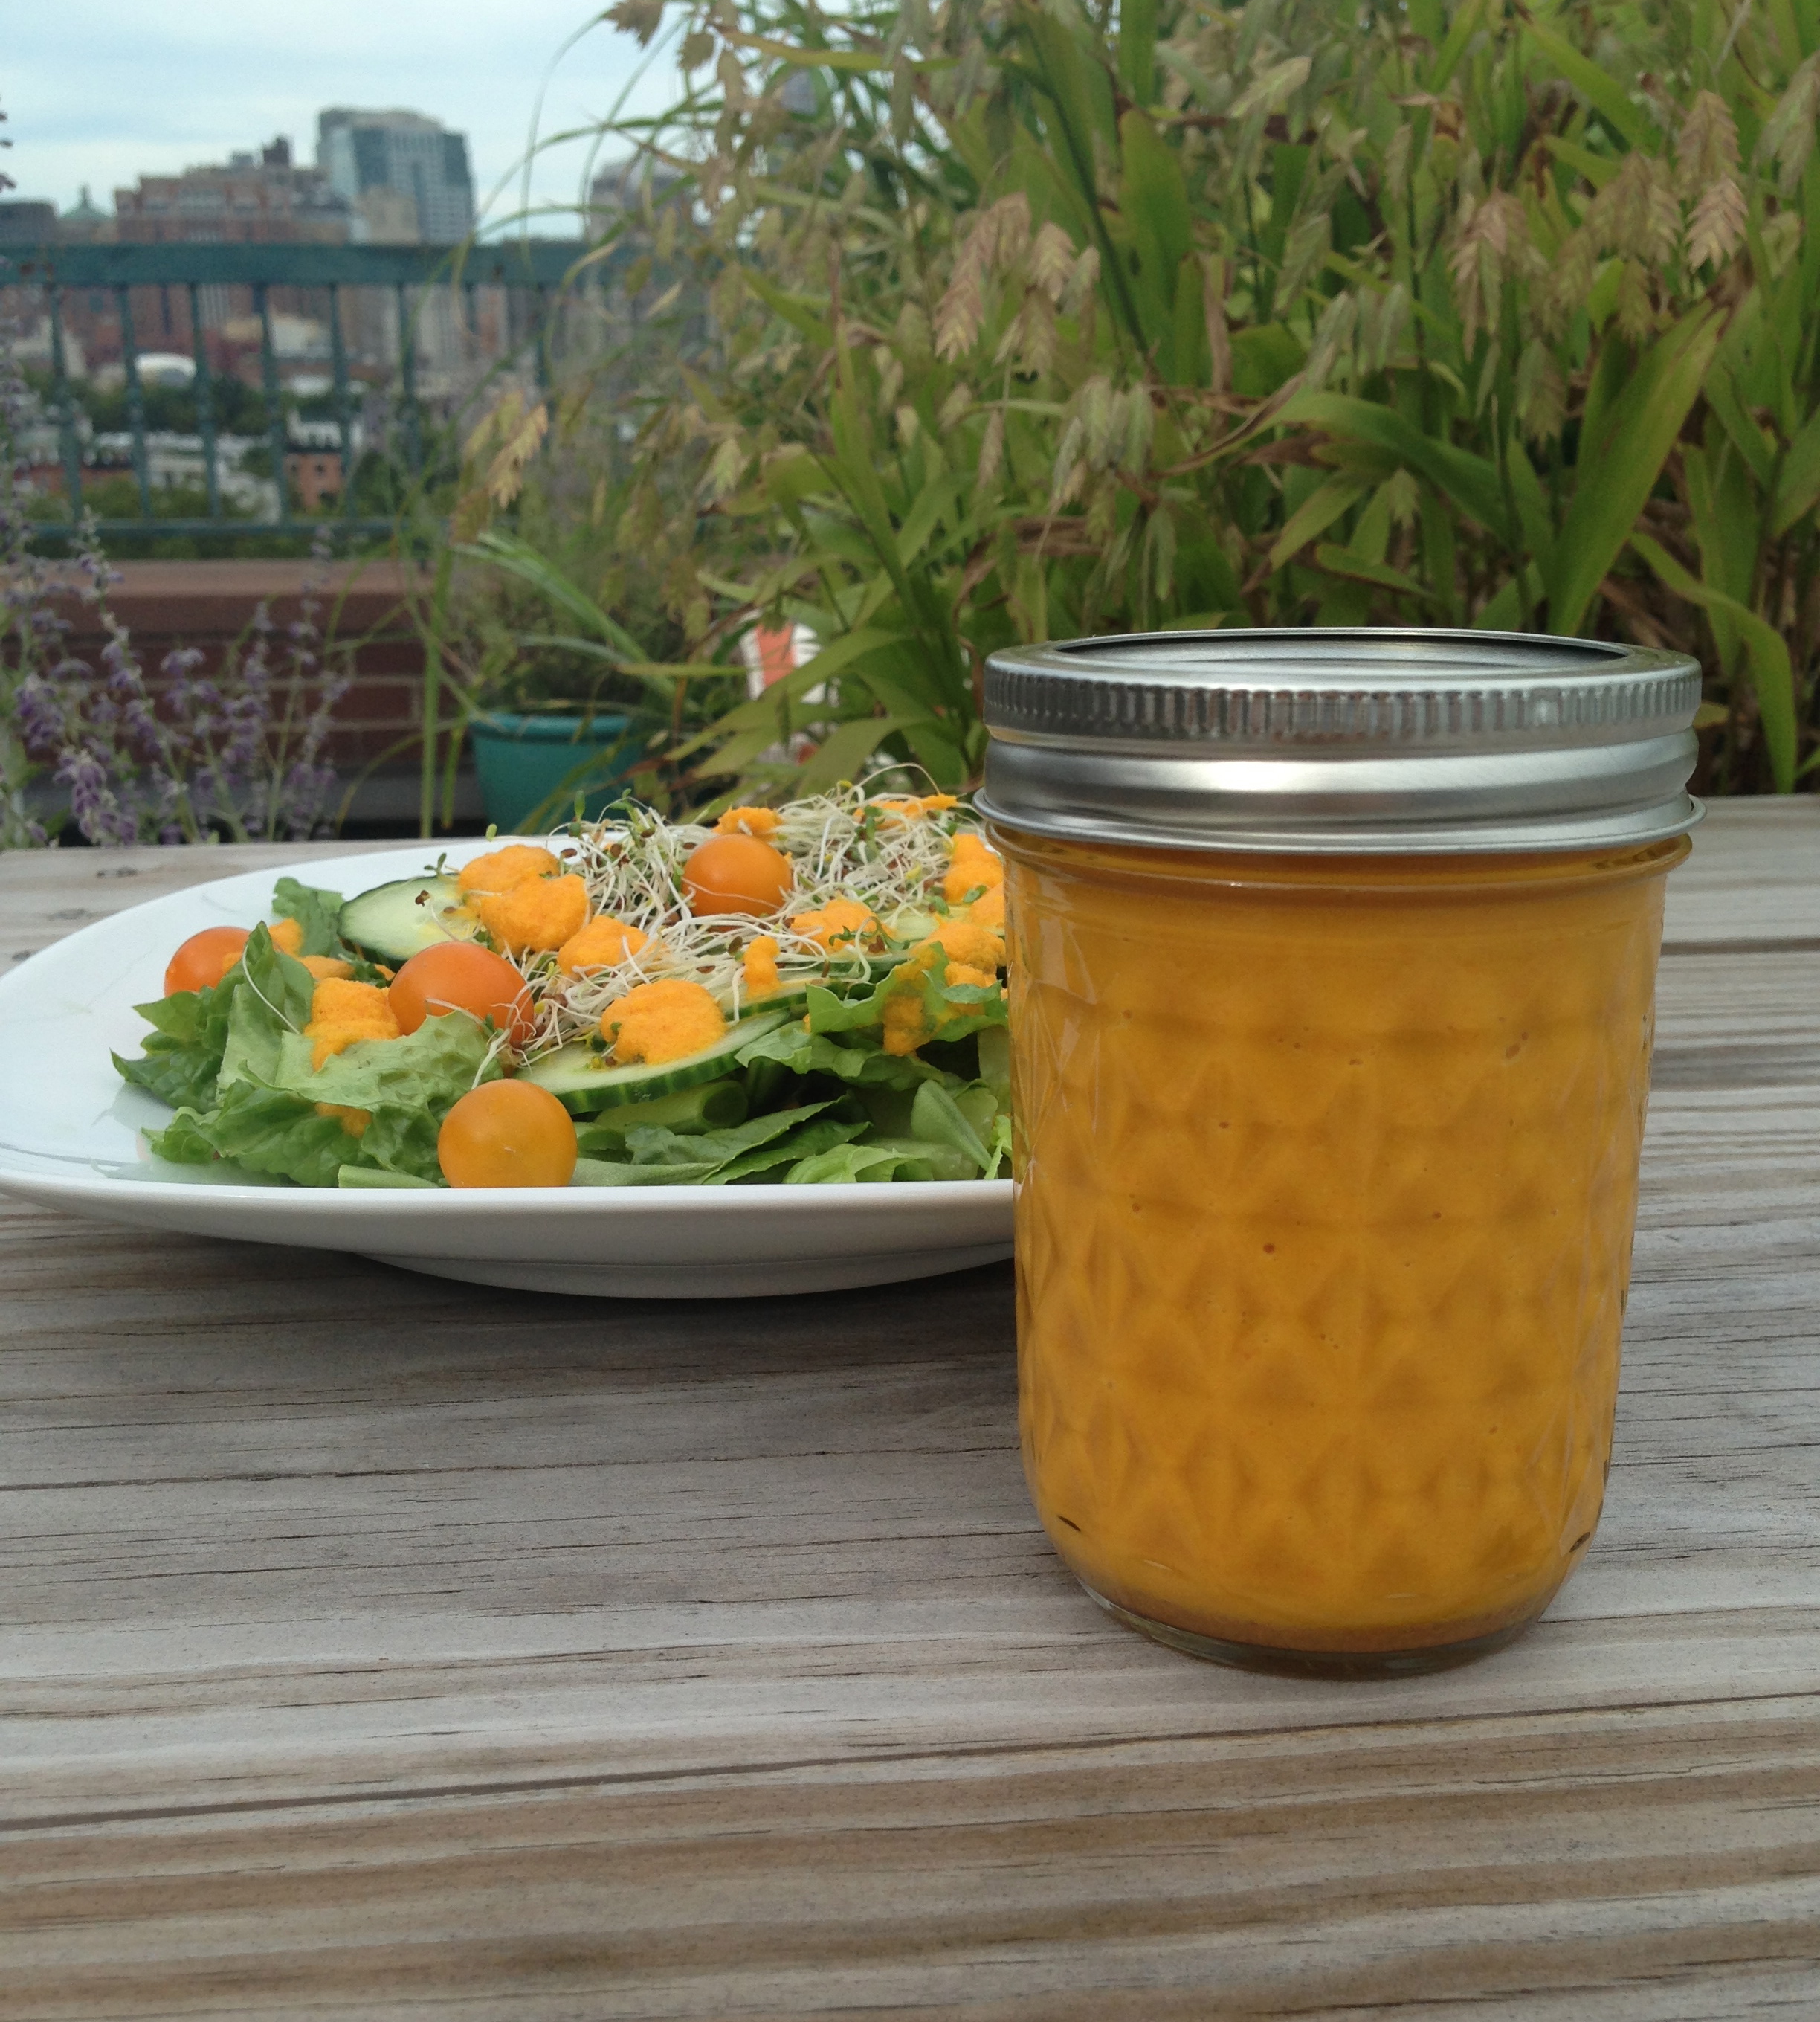
This Japanese-inspired dressing is good on top of most fresh vegetables. If you use less water, it can make a great dip, too. I used this recipe on Epicurious, and only adjusted the amounts of each ingredient. Also, rather than use both a food processor and a blender, I put all the ingredients in the Vitamix at the same time and blended for about a minute until smooth.
- 4 medium carrots, peeled
- 1/3 cup fresh ginger
- 2 shallots
- 1/3 cup rice vinegar
- 2 Tablespoons soy sauce
- 1 Tablespoon sesame oil
- 1/8 teaspoon salt
- 1/3 cup canola oil
- 1/4 cup water (or more to thin out as necessary)
It will keep in an airtight container in the fridge for a week or so. The salad in the picture has lettuce, roma beans, cherry tomatoes, sprouts, and thinly sliced cucumbers. I actually think a great appetizer would be thicker cucumber slices with a dollop of this orange gold on top.
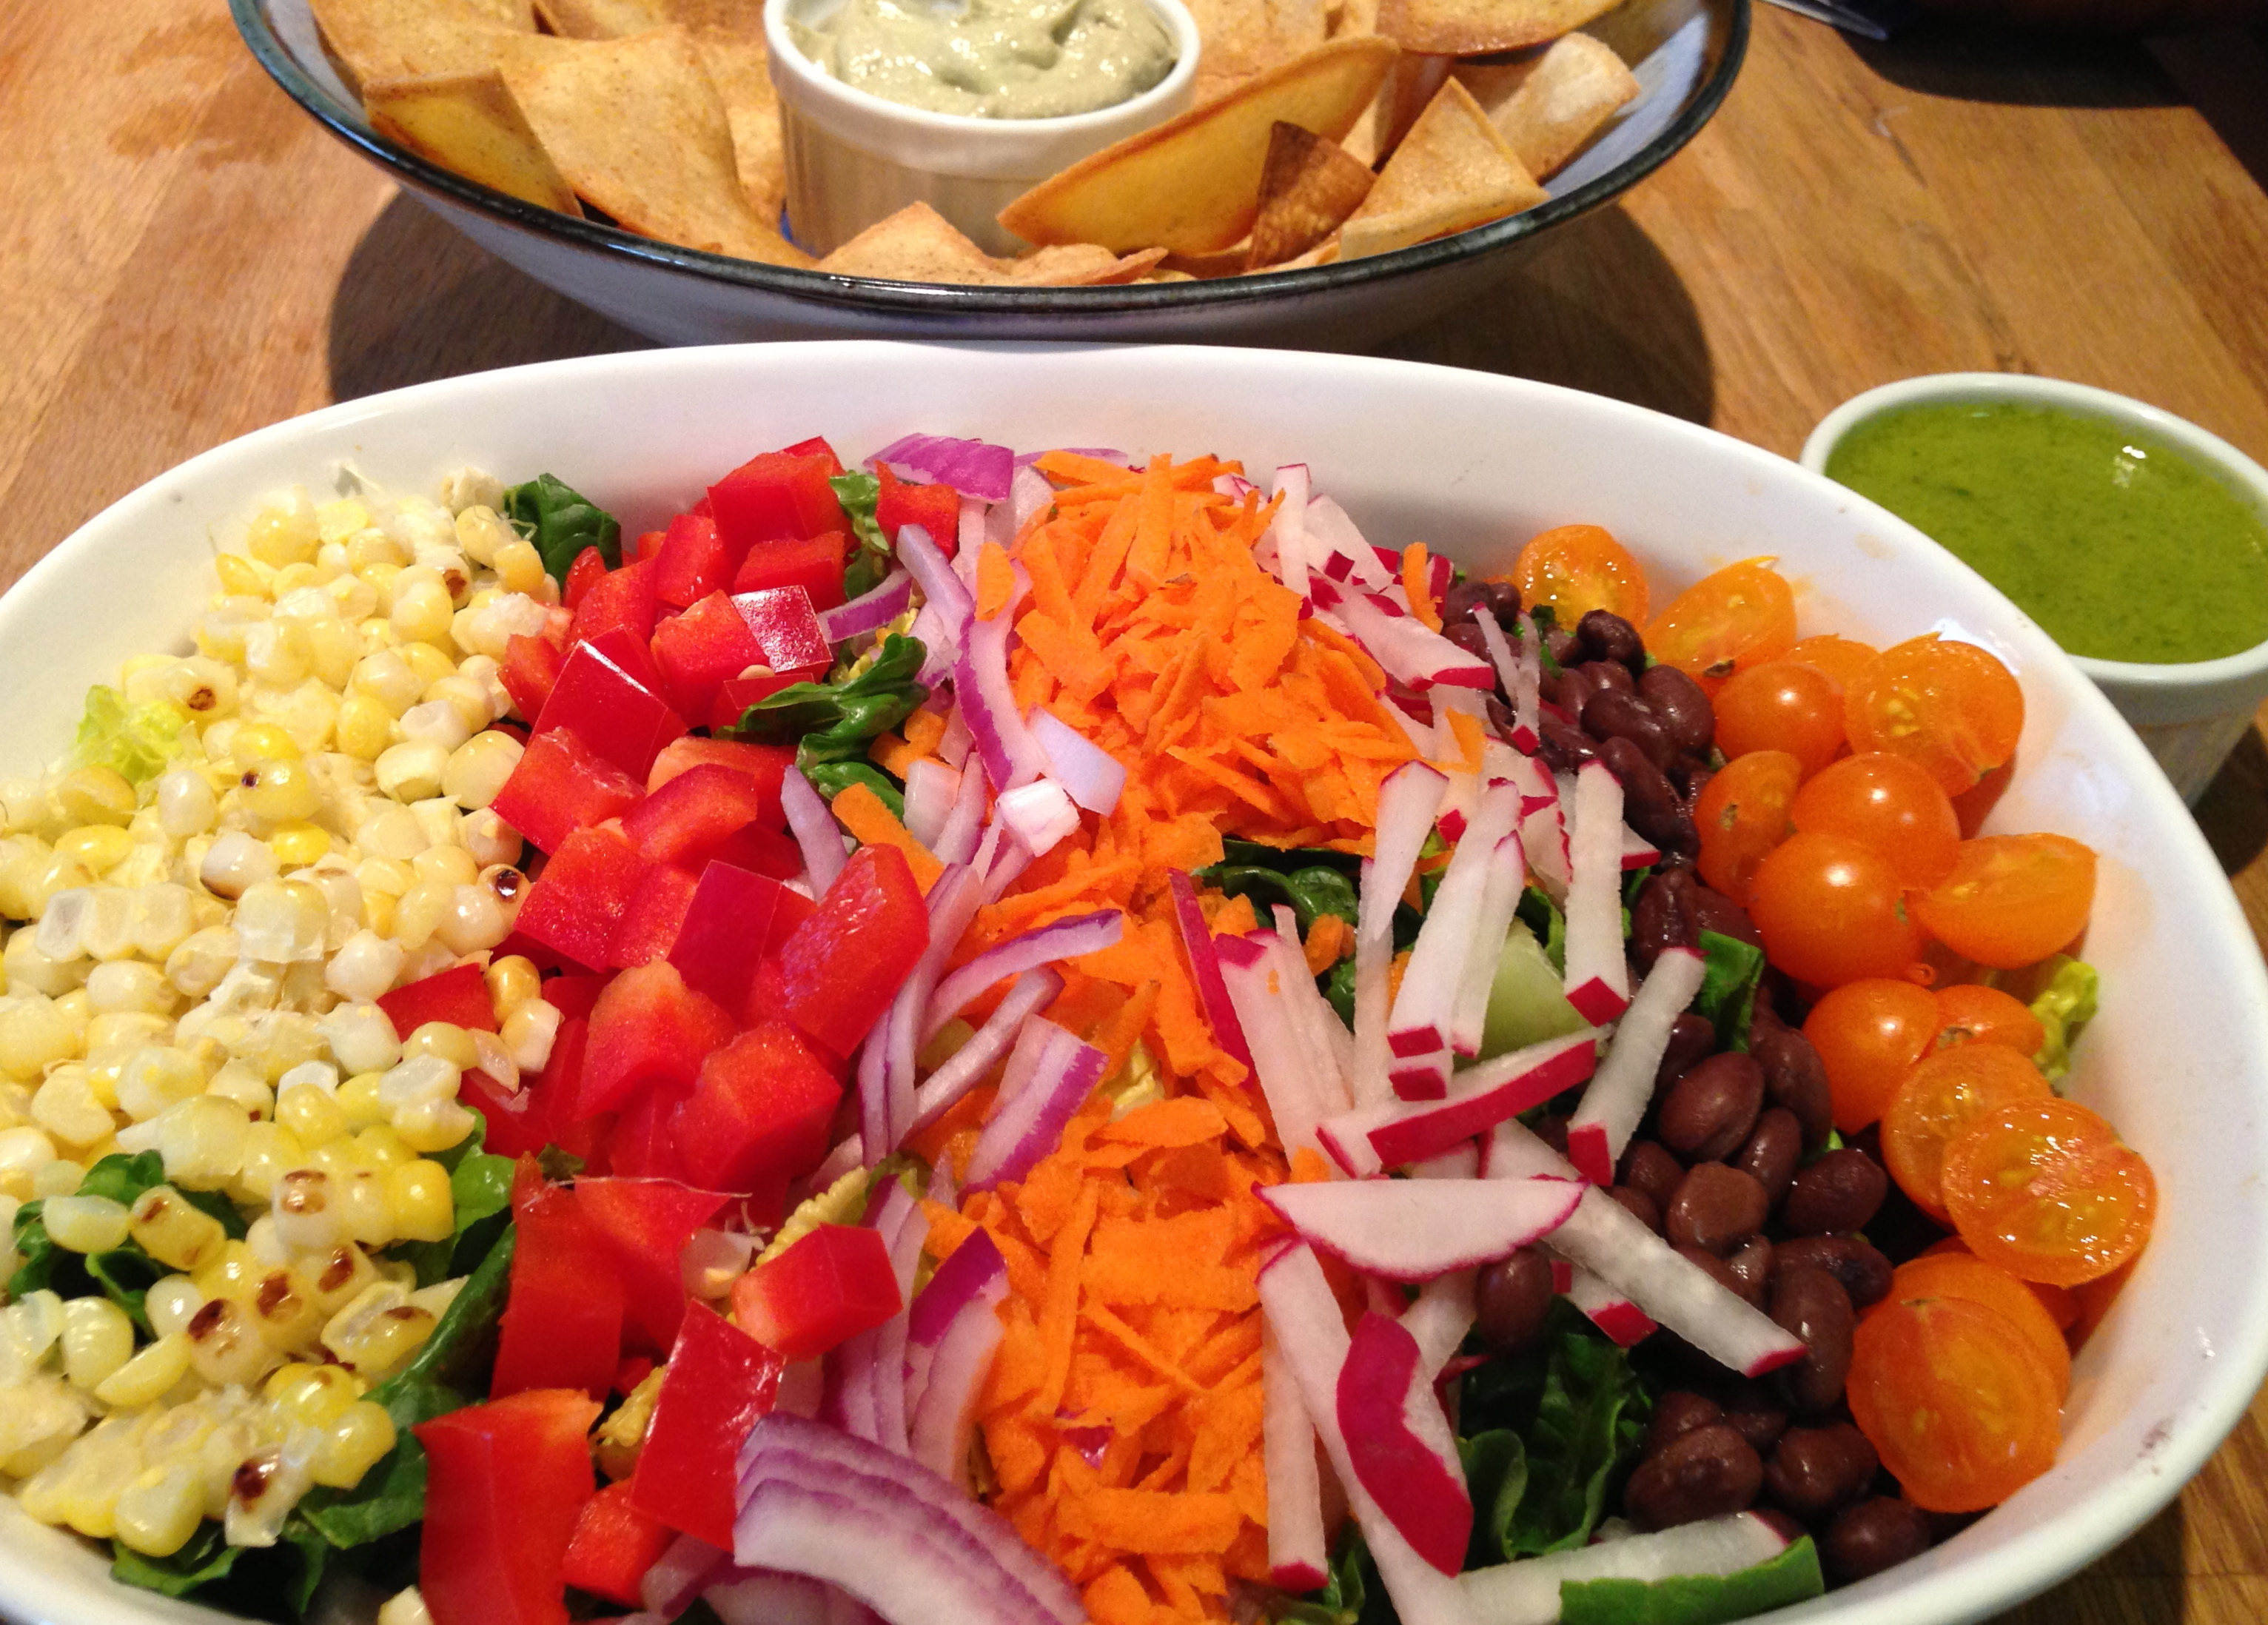
This post features a bunch of recipes. Not only is there the salad and dressing, but I also want to share this simple way to make baked chips. I served it with leftover vegan cashew avocado “cream” from these incredible tofu tacos I discovered on Love and Lemons.
To make the salad (I measured nothing):
Put some chopped romaine lettuce in a bowl.
Top with the following: I chose to do it cobb-salad style, but you can toss it all together, too. Go loco.
- radishes
- cherry tomatoes
- grilled corn (Soak it first for about a half an hour. Grill on medium-high for about 10 minutes, rotating a few times. Then, let it cool and cut it off the cob)
- shredded carrots
- chopped red bell peppers
- thinly sliced red onions
- drained black beans
- optional: shredded cheddar cheese
- You can also do: avocado, jicama, etc.
Basic cilantro-lime dressing:
Blend the following until smooth:
- 2 handfuls of cilantro
- juice of 2 limes
- a little bit of honey (or agave or sweetener of your choice)
- salt/pepper
- a few tablespoons of olive oil
- water to thin out as needed
For the chips:
- Preheat oven to 350 degrees
- Prepare oil: Mix together a few tablespoons of olive oil with spices of your choice. I did a few shakes of cumin and paprika, and then a few pinches of salt.
- Put a stack of corn tortillas on a cutting board and cut them into sixths (first cut in half and then cut each half into thirds)
- Arrange tortilla triangles in a single layer on a cookie sheet (no overlapping) and brush both sides with the oil mixture. Bake for 20-25 minutes, or until slightly brown and crispy.
- Serve with salad and dip of choice.
This cashew pesto is really easy, and can be put on anything. It complemented smoky grilled eggplant.
All measurements are approximate, so adjust according to taste.
Ingredients:
1 cup raw unsalted cashews, soaked for at least an hour
1 teaspoon garlic, chopped
A handful of basil
3-4 tablespoons olive oil
Water to thin out as needed (1/2 cup?)
1/2 t salt
Blend all ingredients until smooth, scraping down the sides of the blender as needed.
For the eggplant…
Turn heat on grill to medium/high.
Slice into planks and brush with olive oil, salt, and pepper.
Grill for 4-5 minutes a side.
Wrap in foil for 10 minutes to evenly cook the eggplant.
To serve, spoon some pesto on the plate and place a few slices of eggplant on the pesto.Top with basil or fresh slices of tomato.


It was one of those perfect-weather weekends in Brooklyn. Even though yesterday included a devastating playoff loss for the Nets, nothing was going to bring me down. We were so inspired by the weather that we grilled for the first time. You can roast this asparagus in the oven if a grill is not nearby. This recipe makes more than enough dressing for 1 bunch of asparagus, and I figure it would taste great on any green salad throughout the week.
Ingredients:
- 1/4 cup extra virgin olive oil
- 1/4 cup balsamic vinegar
- 2 T soy sauce
- 2 cloves garlic, chopped
- 1 T honey or brown sugar
- 2 T peeled and minced ginger (I’m a big fan of the ready-to-go minced ginger in glass jars)
- 1 t sesame oil
- sesame seeds, for garnish (optional) (Really, everything is optional…let’s be honest here)
- 1 bunch asparagus, woody stems removed
Directions:
- Heat a grill to high heat.
- Place the first 7 ingredients (through the sesame oil) in a food processor (a mini one works) and blend until smooth. Add water to thin out if necessary. Set aside.
- Lightly coat asparagus with cooking spray or a touch of olive oil, and put in a grill basket. Heat on a grill for 2-4 minutes, shaking the basket once or twice, until spears are slightly tender and starting to brown. Remove from grill.
- Place asparagus in a large bowl, and coat with a few tablespoons of the dressing. Sprinkle with sesame seeds, if using, and serve.
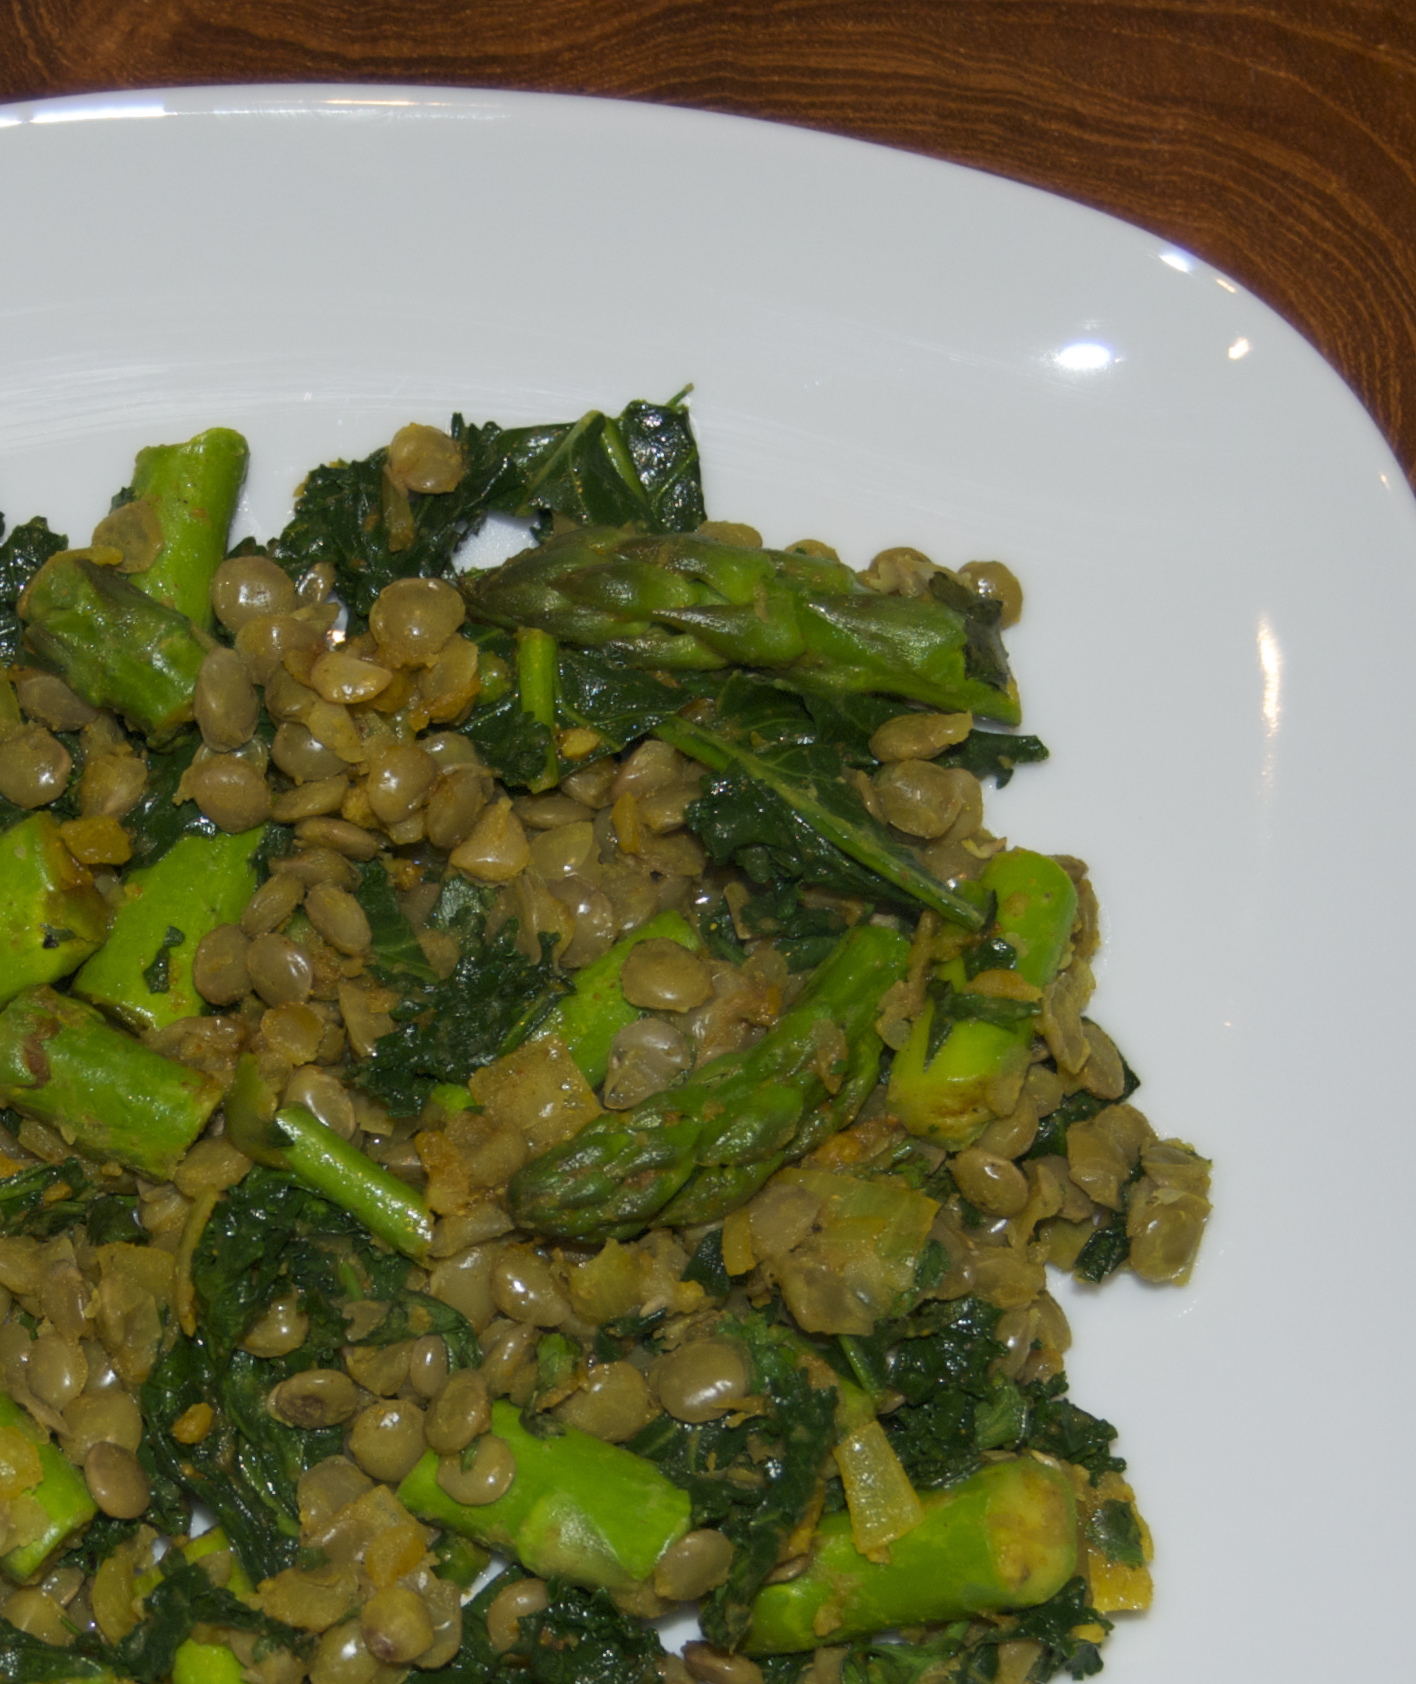
As a follow-up from yesterday, here is a flavorful and simple asparagus recipe. This makes enough for 4 servings. Thanks to Bev Cooks for this recipe. I discovered that green lentils make for a nice weeknight meal because the whole thing took less than 30 minutes.
Ingredients:
- 1 cup green lentils
- 2 Tbs. extra-virgin olive oil
- 1/2 medium yellow onion, finely chopped
- 3 cloves garlic, minced
- 1 Tbs. freshly minced fresh ginger
- 1 Tbs Indian curry powder
- 1/2 bunch asparagus, sliced into 1-inch pieces
- 1 bunch kale, chopped
- 1/4 cup chopped cilantro
- 1 lemon
- coarse salt and freshly ground pepper
Directions:
- Bring a pot of salted water to a boil. Add the lentils and cook until tender, about 25 minutes.
- Heat the oil in a medium skillet over medium high. Add the onion and saute until it starts to soften, 5 minutes. Add the garlic and ginger and cook for 30 seconds. Add the curry powder and a pinch of salt and pepper. Continue to cook the spices for another 30 seconds, or until fragrant.
- Add the asparagus and saute until bright green, 2 minutes. Add the kale and continue to saute until wilted, another 2 minutes.
- Drain the lentils and add them to the kale mixture. Toss to combine. Sprinkle with lots of cilantro and a good squeeze of the lemon juice. Add more salt to taste.
- Serve with more cilantro and lemon juice
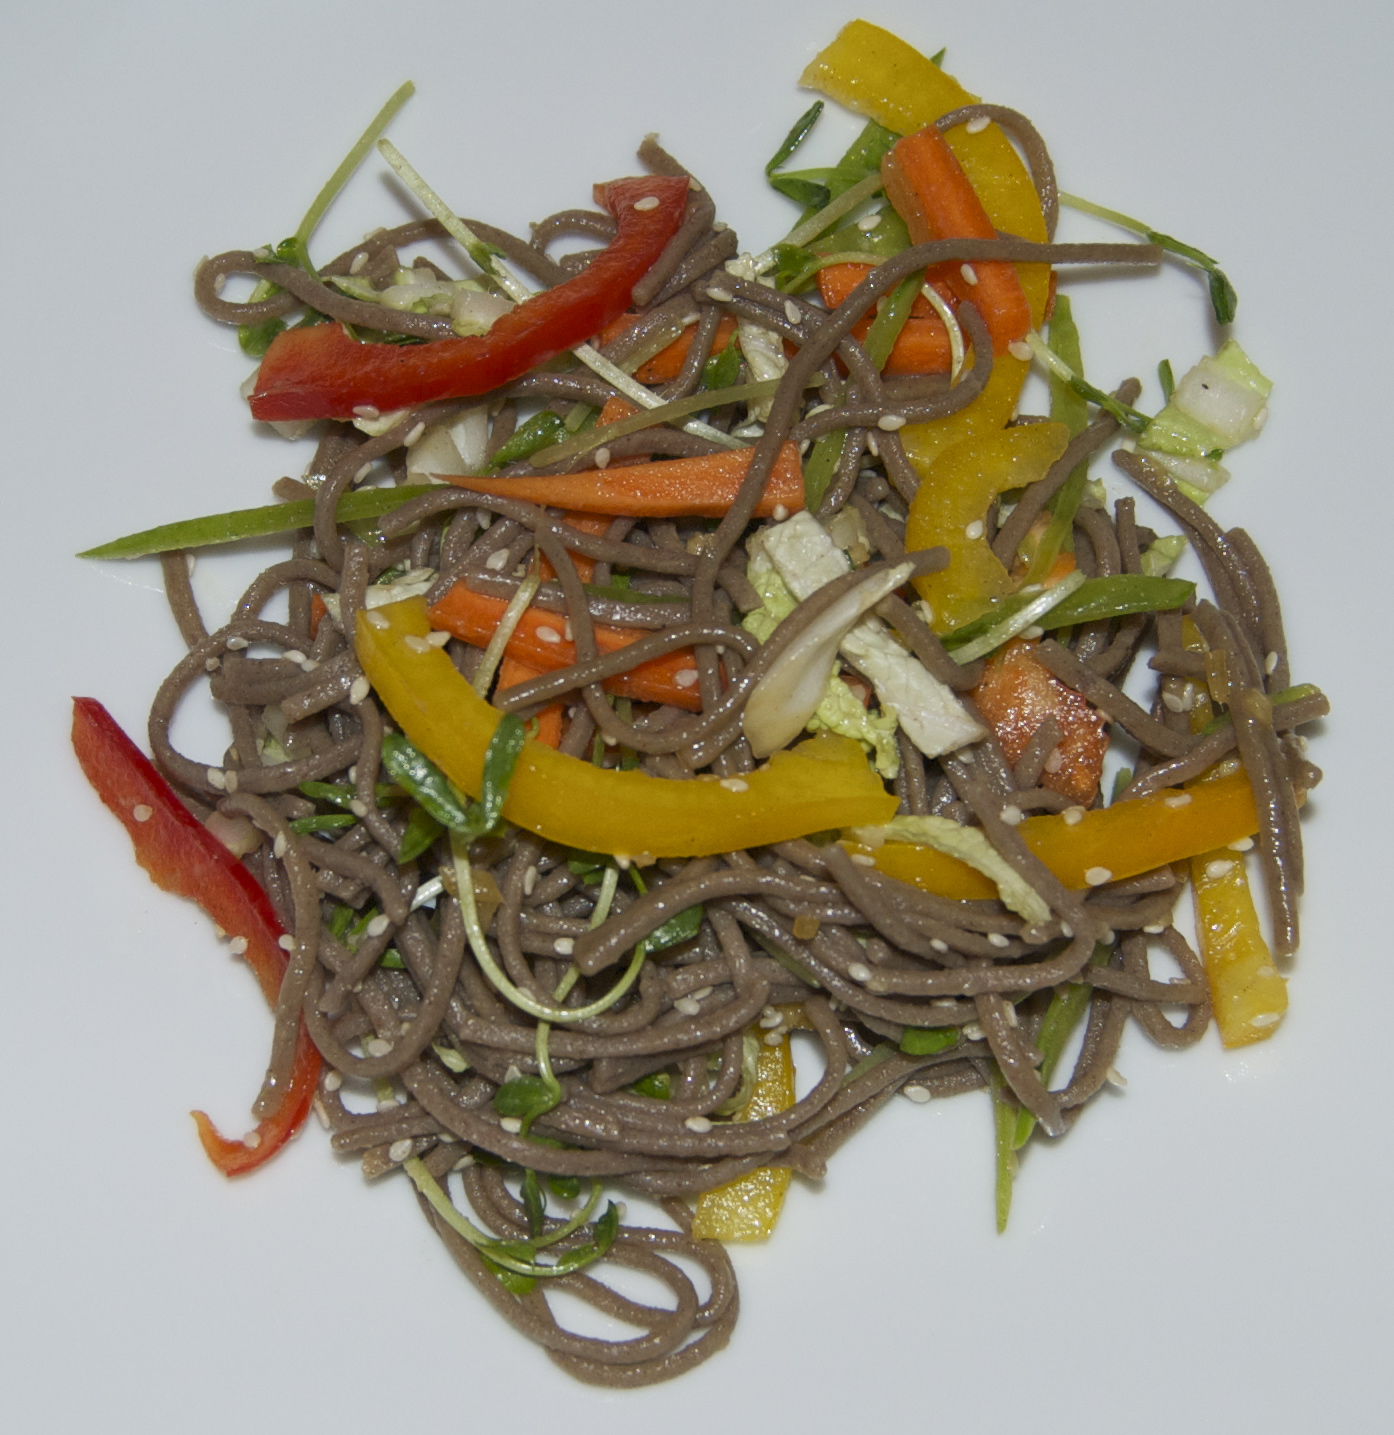
Here’s another vegan winner from Crazy Sexy Kitchen. It was refreshing and well-balanced, with a little bit of heat (especially since we kept all the seeds in the serrano pepper). This salad can be a meal by itself, but we had some edamame with it for a little more protein.
Ingredients:
- One 8-ounce package of buckwheat soba noodles
- 1/2 cup thinly shredded Napa cabbage
- 1/2 red bell pepper, thinly julienned
- 1/2 yellow bell pepper, thinly julienned
- 1/4 cup thinly julienned snow peas
- 2 carrots, thinly julienned, or shredded
- 1/2 cup buckwheat sprouts, sunflower sprouts, or pea shoots (my choice), plus more for garnish
- 3 tablespoons sesame seeds, lightly toasted (just realized I didn’t toast mine…oops!), plus more for garnish
For the dressing: Whisk the following ingredients in a small bowl and set aside:
- 1 teaspoon olive oil
- 1.5 teaspoons toasted sesame oil
- 2 teaspoons tamari
- 2 tablespoons rice vinegar
- 2 teaspoons agave (I used honey, so this recipe is only mostly vegan)
- 1/2 teaspoon finely minced ginger
- a tiny bit of minced chile pepper
Directions:
- Cook the buckwheat according to the package instructions. Do not overcook; buckwheat is very temperamental and falls apart if cooked too long. Strain and rinse with cold water to stop the noodles from cooking further.
- Toss the cooked noodles with cabbage, red and yellow bell pepper, snow peas, carrots, sprouts, and sesame seeds in a mixing bowl. Set aside some sprouts and sesame seeds for a garnish.
- Pour the dressing evenly over the salad, toss gently, and serve.
- Before serving, garnish with leftover sprouts and sesame seeds.

This recipe came from Cooking Light magazine. It’s a perfect addition to a fall meal. It brightens up the plate and has a great flavor.
All of the herbs came from my garden. However, the cilantro was special. A few months ago in the heat of summer, I was frustrated that my cilantro kept bolting. I decided to let it flower and turn to seed so I could make my very own coriander seed. Once the plants got to the right point (for us, the right point was when we were sick of the constant swarm of bees who adored our cilantro flowers), I cut and then dried the plants in a paper bag. Then, I hung the bag inside for a few weeks. After a few weeks, I gave the bag a few shakes. Amazingly, there were some coriander seeds at the bottom of my bag. However, the yield was less than I hoped for: just a few tablespoons. I think I should have waited a bit longer to chop down the flowering cilantro before letting it dry.
Rather than save the coriander, I continued on with my experiment. I planted the coriander a few inches deep in the empty pot that used to house the cilantro. A few week later….little baby cilantro plants started popping up. I watered them gently at first. A few weeks later than that…carrot salad with a hit of heat features my very own “circle of life” cilantro. I know this is basic stuff to some people, but I was amazed that this process actually works.
Ingredients:
- 3 tablespoons extra-virgin olive oil
- 1 tablespoon fresh lemon juice
- 1 teaspoon sambal oelek (ground fresh chile paste)
- 4 cups coarsely grated carrot (about 1 pound)
- 3/8 teaspoon kosher salt
- 2 tablespoons chopped fresh cilantro
- 1 tablespoon minced fresh mint
- 1 tablespoon minced fresh chives (optional)
Directions:
- Combine first 3 ingredients in a large bowl, stirring with a whisk. Add carrot and salt; toss to coat. Let stand 30 minutes. Just before serving, add cilantro, mint, and chives, if desired; toss to combine.

This is a special edition “request” post (thanks, A.H.) for a dish I made for a dinner party last week. I wasn’t planning on posting it, so there is no photo. If anyone makes this–can you please take a picture and forward it to me?
It comes from Jack Bishop’s A Year in a Vegetarian Kitchen. It’s vegan and delicious.
Ingredients:
- 2 tablespoons extra virgin olive oil
- 2 medium onions, halved and thinly sliced
- 1 tablespoon minced gingerroot
- 2 medium garlic cloves, minced
- 1 teaspoon ground cumin
- 1 teaspoon ground cinnamon
- 2 1/2 cups vegetable broth
- 1 15-ounce can chickpeas, rinsed and drained
- 1 medium sweet potato, peeled and cut into 1/2 inch dice (I actually used almost 2 sweet potatoes)
- 6 pitted prunes, chopped
- 2 tablespoons minced fresh cilantro leaves (I minced these and then forgot to add them, so I guess feel free to leave them out)
- salt and freshly ground black pepper
Directions:
1. Heat the oil in a large sauté pan or Dutch oven over medium heat until shimmering. Add the onions and cook until golden, about 5 minutes. Add the ginger and garlic and cook until fragrant, about 1 minute. Stir in the cumin and cinnamon and cook until the spices smell toasty, about 30 seconds.
2. Add the broth, chickpeas, sweet potato, and prunes and bring to a boil. Reduce the heat, cover, and simmer, stirring once or twice, until the sweet potatoes are tender, 12-15 minutes. Stir in the cilantro (!) and salt and pepper to taste and serve.
The peaches this year have been delicious, and my only complaint is that we cannot eat them all before they spoil. So, I opened up Sherri Brooks Vinton’s preserving book: Put ‘Em Up! and got to work. This week’s preserving projects were Peach Salsa and Peach Leather.
Peach Salsa

Note: If you are planning on canning the salsa, read the information at the bottom of the directions first, since you need to prepare your materials ahead of time. Canning can be a daunting project when working solo. I recommend canning in a small group to ease the stress and add to the fun. Canning is a great way to enjoy the bright flavors of summer in the dead of winter. If you plan on eating or sharing the salsa within a week, no need to can it.
Ingredients
- 3 pounds peaches
- 1 cup cider vinegar
- 1 cup brown sugar, lightly packed
- 1 tablespoon ground cumin
- 1 tablespoon salt
- 1 pound tomatoes, cored, seeded, and diced
- 1 red bell pepper, diced
- 1 jalapeno pepper, diced
- 1 red onion, diced
- 1/4 cup minced fresh cilantro (which I went through the trouble of mincing and then forgot to add it before canning..oops!)
Directions
- Prepare an ice-water bath in a large bowl.
- Bring a large pot of water to a boil. Working in batches of 2 at a time, blanch the fruit in the boiling water for 30 seconds to loosen the skins.
- Scoop the peaches out of the water and plunge them into the ice-water bath. Repeat with the remaining peaches. Drain.
- Combine the vinegar, brown sugar, cumin and salt in a large nonreactive pot. Using a small paring knife, peel, pit, and dice the peaches, adding them to the pot as you go to prevent browning. Add the tomatoes, bell pepper, jalapeno, and onion, and bring to a boil. Reduce the heat and simmer until thickened, about 15 minutes. Add the cilantro (!) and remove from the heat.
- At this point, you can simply ladle the salsa into bowls or jars, and refrigerate for up to a week, covered. OR—You can CAN them so they can stay in the pantry for up to a year. Keep reading to find out how>>>
Canning the peach salsa:
You will need:
- Canner (or large pot with layer of jar rings on the bottom, thread side down) Your container should be large enough that there is at least 2 inches of space above the height of the cans.
- jars (I used 3 pint jars for this recipe, and there was some salsa leftover to eat right away. You can also use double the amount of half-pint jars, as they will require a shorter canner.) You will need extra jars to fill up the canner, so the cans do not tip while processing.
- jar lifter
- jar rings–you can reuse these; just make sure they are clean and free of rust
- jar lids (may only be used once for canning)
- canning funnel
- bubble tool or chopstick
- clean kitchen towels and several paper towels
- Right away, get the canner filled up with water–enough to cover the jars– and heat it up with the lid on. It will take a while to bring to a boil, and you want it to be ready while the salsa is still hot so you can do a hot fill.
- Run the jars in the dishwasher to ensure they will be clean and piping hot when the salsa is ready to go.
- Wash the lids and place them bottom-side down in a small heat-proof bowl. If you don’t have/don’t want to use a dishwasher, you can bring the jars to a boil in the canner once to get them nice and hot.
- Prepare the recipe as outlined above.
- Lay out a clean kitchen towel and have all our equipment nearby.
- Using the canning tongs, remove a jar from the canner, and carefully tip the hot water into the bowl with the jar lids so their sealing rings begin to soften. If your jars were in the dishwasher, just pout hot water over the lids–you can ladle some from the canner.
- Use the canning tongs to remove additional jars from the canner, emptying the water directly back into the canner and placing them, open side up, on a clean kitchen towel.
- Use the canning funnel to fill a jar with the hot salsa, leaving 1/2 inch of headspace.
- Release trapped air with your bubble tool or chopstick.
- Wipe the rim clean with a paper towel, center lids on the jars and screw on the ring until it is finger-tip tight (not knuckle!)
- Repeat steps 7-10 with remaining jars.
- Use the canning tongs to lift the filled jars (be careful not to tip them) and lower them into the canner, being sure they are covered by 2 inches of water.
- Cover the pot and bring the water to a rolling boil. Lower the heat a bit, so the water isn’t rolling out of the pot by still maintains a lot of rolling action. Start timing 15 minutes after the full boil is reached.
- After 15 minutes, turn off the heat and remove the lid from the canner.
- Let the jars cool in the canner for 5 minutes. This way they won’t spurt at you!
- After 5 minutes, use the canning tongs to lift the jars STRAIGHT out of the canner. Do not tip them!! Place them on a clean dish towel-covered counter.
- Let cool overnight. You will need to tighten the jars again. Store them in a cool, dark place for up to one year.
Here are some helpful resources on canning:
http://www.canningusa.com (detailed videos/tutorials)
http://sherribrooksvinton.com: Sherri Brooks Vinton’s site
****************
Peach Leather

Ingredients:
- 2 pounds peaches
- 1 cup water
- 2 tablespoons bottled lemon juice (I used freshly squeezed lemon juice, but that might explain my uneven results)
- 1/4 cup sugar
Directions:
- Prepare an ice-water bath in a large bowl.
- Bring a large pot of water to a boil. Working in batches of 2 at a time, blanch the fruit in the boiling water for 30 seconds to loosen the skins.
- Scoop the peaches out of the water and plunge them into the ice-water bath. Repeat with the remaining peaches. Drain. Using a small paring knife, peel, pit, and roughly chop the peaches.
- Bring the peaches and 1 cup water to a boil in a medium nonreactive saucepan (I used stainless steel). Simmer until they begin to break down, about 5 minutes. Remove the fruit from the heat, let cool slightly, and puree with a traditional blender or stick blender, or by running it through a food mill.
- Preheat the oven to 170 degrees F. Line a jelly roll pan or a rimmed baking sheet with parchment paper or a silpat and set aside.
- Return the puree to the pot and simmer over low heat, stirring frequently, until it thickens to the consistency of baby food. Add the lemon juice and sugar and stir to dissolve.
- Spread the puree on the baking sheet, tilting it to create an even layer about 1/8 inch thick. Dry in the oven until tacky to the touch, about 2 hours. *
- Cool to room temperature. Slide the parchment onto a cutting board and roll the leather into a tube. Slice the tube into 2-inch segments and store in a covered jar for up to 1 month.
*My puree took much longer than 2 hours before it turned tacky, and when it did turn tacky it did so unevenly. Next time, I will try to spread it in a thinner layer, and make sure it is as even as possible. Also, I will try to use bottled lemon juice as this may have caused the problem, too. I’d love to hear how yours comes out!
