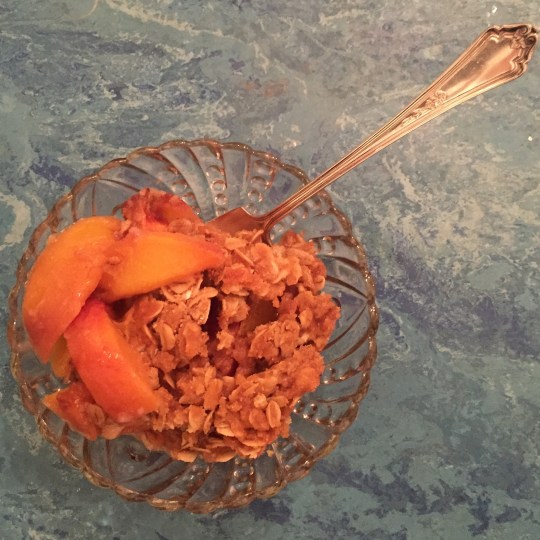
Looking for a perfect* summer dessert? Stop googling and start making this. This particular crisp was made from peaches purchased at Sweet Corn Charlie’s stand in Syracuse, Indiana. They were the kind of peaches that were begging to be eaten–perfectly fragrant and just soft enough that if we let them go another day they would have turned to mush.
This is a simple recipe with ingredients you might even have in your pantry and fridge. You can even make it ahead and keep it in the fridge until you are ready to bake it. The hardest part is remembering to turn on the oven before dinner so you can pop the crisp in the oven while you eat. My suggestion is to serve it with some vanilla ice cream**, but then again my suggestion is to always serve everything with some vanilla ice cream. Thanks to T for creating this with me and remembering that very important step to turn the oven on. This recipe comes from All Recipes.
*By perfect I mean one that does not take your time away from having lots of summer fun outside.
**That is, unless you already had a root beer float 2 hours earlier because you were trying to fit an entire summer into one day.
Ingredients:
5-6 peaches, sliced
1/2 c all purpose flour
1/2 c brown sugar
1 stick of cold butter (1/2 c), cut into pieces
1 c rolled oats
1 t ground cinnamon
1/4 t salt
Directions:
- Preheat oven to 350 degrees.
- Arrange peaches evenly in 8X8 baking dish.
- Mix flour, sugar, butter, cinnamon and salt in a bowl. Mix in the oats. Sprinkle and press topping into the peaches.
- Bake for 30 minutes, or until topping is browned.
 Are you tired of sautéing or steaming your green beans? Well, the temperature finally dropped below 80 degrees, so now is a great time to make some soup.
This is a protein-packed vegan soup with a mild flavor and very few ingredients.
Thank you to Chocolate & Zucchini for this wonderful recipe, which I adapted only a little bit based on what I had in my fridge this morning!
Ingredients:
3 tablespoons olive oil
1 onions, peeled and chopped
1 garlic clove, peeled and smashed
12 baby carrots, sliced
About a pound of green beans, rinsed and trimmed
salt and pepper to taste
1 cup vegetable broth
3 cups water
1.5 cups sliced almonds
Directions:
- Heat the oil in a medium heavy-bottomed soup pot. Add the onions and carrots, and cook over medium heat, stirring every now and then, until softened and very lightly golden. Add the garlic and stir for minute. Add the green beans to the pot, season with salt and pepper, and cook for 5 minutes, stirring from time to time.
- Pour in the broth and water, bring to a simmer, cover, and cook for about 20 minutes, until all the vegetables are soft. In the meantime, pour the sliced almonds in a dry skillet. Set over medium-high heat and toast for about two minutes, stirring constantly and watching closely, until golden and fragrant. Set aside in a bowl to prevent overtoasting.
- When the vegetables are soft, add the almonds to the pot and stir well. Remove from heat and let cool slightly. Use a high powered or immersion blender to mix all ingredients until velvety smooth. Taste, adjust the seasoning, reheat over gentle heat if necessary, and serve.

Sometimes G goes on a ketchup, butter, and bacon diet, like at dinner last night.
Then I wake up the next morning and try to do some damage control.
Enter Greek Yogurt Ice Pops. Thanks to CB for the inspiration!
I used blackberries and peaches because that’s what was at the Carroll Gardens Farmer’s Market yesterday, but you can use any fruit/yogurt combination. Why not put in some greens, too?
We did rainbow pops last year without yogurt and those are just as delicious but in a different vegan sort of way. It depends on what you’re in the mood for. If you want to know more about these freezer molds, check out that post.
Ingredients:
1/3 cup Greek Yogurt (We love Wallaby)
a handful of blackberries (I used 5 large ones)
1 peach, peeled
1 teaspoon honey
1/2 cup water, more as needed
Directions:
Combine all ingredients in blender and blend until liquified. Add more water to thin as needed. Freeze for at least 4 hours. Enjoy!
BONUS: If you have a toddler, this human can help you with every step of this process. G especially liked putting the handles in the molds like a little puzzle.

Here’s another way to preserve the jalapeños that are taking over my rooftop. If you don’t have this problem, its worth buying a whole bunch of hot peppers so you can make your own spicy sauce, which is much better than anything you can buy in the store. I only slightly modified yet another incredible recipe from Karen Solomon’s Jam It, Pickle It, Cure It.
This recipe makes about 3 cups and the sauce will last in the fridge for 6 months.
Warning: Wear gloves and work in a well-ventilated area when working with jalapeños.
Ingredients:
20-25 jalapeño peppers
2 large cloves of garlic, peeled
1.5 T kosher salt
1 cup distilled white vinegar
2 T sugar
Directions:
- Wash and dry the peppers and cut off the stems. Slice them in half lengthwise. Broil, outside skin near flame, until black and charred. Check the every few minutes as once they start charring, they turn black pretty quick.
- In a food processor or blender, puree the garlic until minced. Add the peppers, salt, vinegar, and sugar and puree for about 3 minutes. If you have a high power blender, just run all the ingredients together for 1 minute.
- Transfer to a glass jar and refrigerate.

Here’s a quick way to preserve jalapeño peppers. Great for topping nachos, salads, in sandwiches, etc.
Ingredients:
3/4 cup distilled white vinegar
3/4 cup water
1 garlic clove, crushed
3 T white sugar
1 T kosher salt
10 jalapeños, sliced into rings – use gloves to chop or you’ll regret it later when you take out your contact lenses.
Directions:
Pour all ingredients except peppers into a small pot. Once mixture boils, stir in jalapeños and remove from heat. Let sit for ten minutes and watch the color turn before your very eyes.
Use tongs or a slotted spoon to transfer jalapeños to a pint size mason jar and cover with vinegar mixture. Bottle it up, and enjoy topping your food with a kick for the next month or so.


Here’s a great way to get creative with your bumper crop of cucumbers, and it takes only 10 minutes from garden to plate. I used a mandolin for maximum beauty and because I like to live on the edge. Thanks to Karen Solomon and her book Jam It, Pickle It, Cure It for this and so many other fun kitchen ideas.
Ingredients:
1 large cucumber – sliced thin
1 small red onion-sliced thin
2 teaspoons brown rice syrup (or sugar or your sweetener of preference)
2 teaspoons kosher salt
1/2 cup unseasoned rice vinegar
Mix all ingredients together and let sit for 30 minutes. It can be refrigerated for 2 days.

It was a cool day at the lake today, so we headed to The Berry Patch in Etna Green, Indiana for blueberry picking. This jam became the perfect highlight of this colorfully festive blueberry and ricotta crostini which can be made in less than 30 minutes from beginning to end. Add a strawberry or raspberry for an additional color and you have a perfect snacketizer for the 4th of July.
Ingredients: (this makes about 3/4 cups jam when cooked)
2 cups blueberries
1/2 cup sugar
1/2 T lemon juice
Heat all ingredients in a saucepan over medium heat, stirring frequently until thickened. You know its ready when is starts to stick to the spoon and your toddler is screaming that he wants some NOW!
For the crostini, simply broil some slices of french bread in the oven. Then get creative with decorating with ricotta cheese, blueberry jam, and your red berry of choice.


I made this coleslaw for Father’s Day and have looked forward to having it a snack every day since. It’s a perfect food to bring to a 4th of July BBQ or picnic because it can be prepared ahead of time. The magical thing about this coleslaw is that even though we keep eating it, the bowl is still practically full. I’m not really sure what causes this phenomenon. It’s like the everlasting gobstopper of salads. Anyway, it took about 15 minutes to whip it up in the food processor, and I am grateful for that as well. If you don’t have a food processor handy, you can do all the slicing by hand…but it will be much more time-consuming. This recipe also came from Williams-Sonoma’s Salad of the Day book.
Ingredients:
- 1 head green cabbage (about 2 lb)
- 2 celery ribs
- 1 granny smith apple
- 1 small red onion
- 2 small carrots
- 2 T cider vinegar, or as needed
- 2 T minced fresh flat-leaf parsley
- 1 1/4 c mayonnaise
- salt and freshly ground pepper
Directions:
- Cut the cabbage through the stem end into wedges, and cut out the core. Using a food processor fitted with the thin slicing attachment, slice the cabbage into thin slivers. Transfer to a (very!) large bowl. Slice the celery crosswise in the same way and add it to the cabbage.
- Replace the slicing attachment with the shredding attachment. Halve and core the apple but do not peel. Cut the apple and onion into wedges. Shred the apple, onion, and carrots, and add to the cabbage and celery.
- Sprinkle the vegetables with the vinegar and toss to coat evenly. Add the parsley and mayo and mix well. Season with salt and pepper to taste. Cover and refrigerate until chilled, at least two hours. Taste and adjust the seasoning with more vinegar, salt, and pepper before serving. Serve chilled.
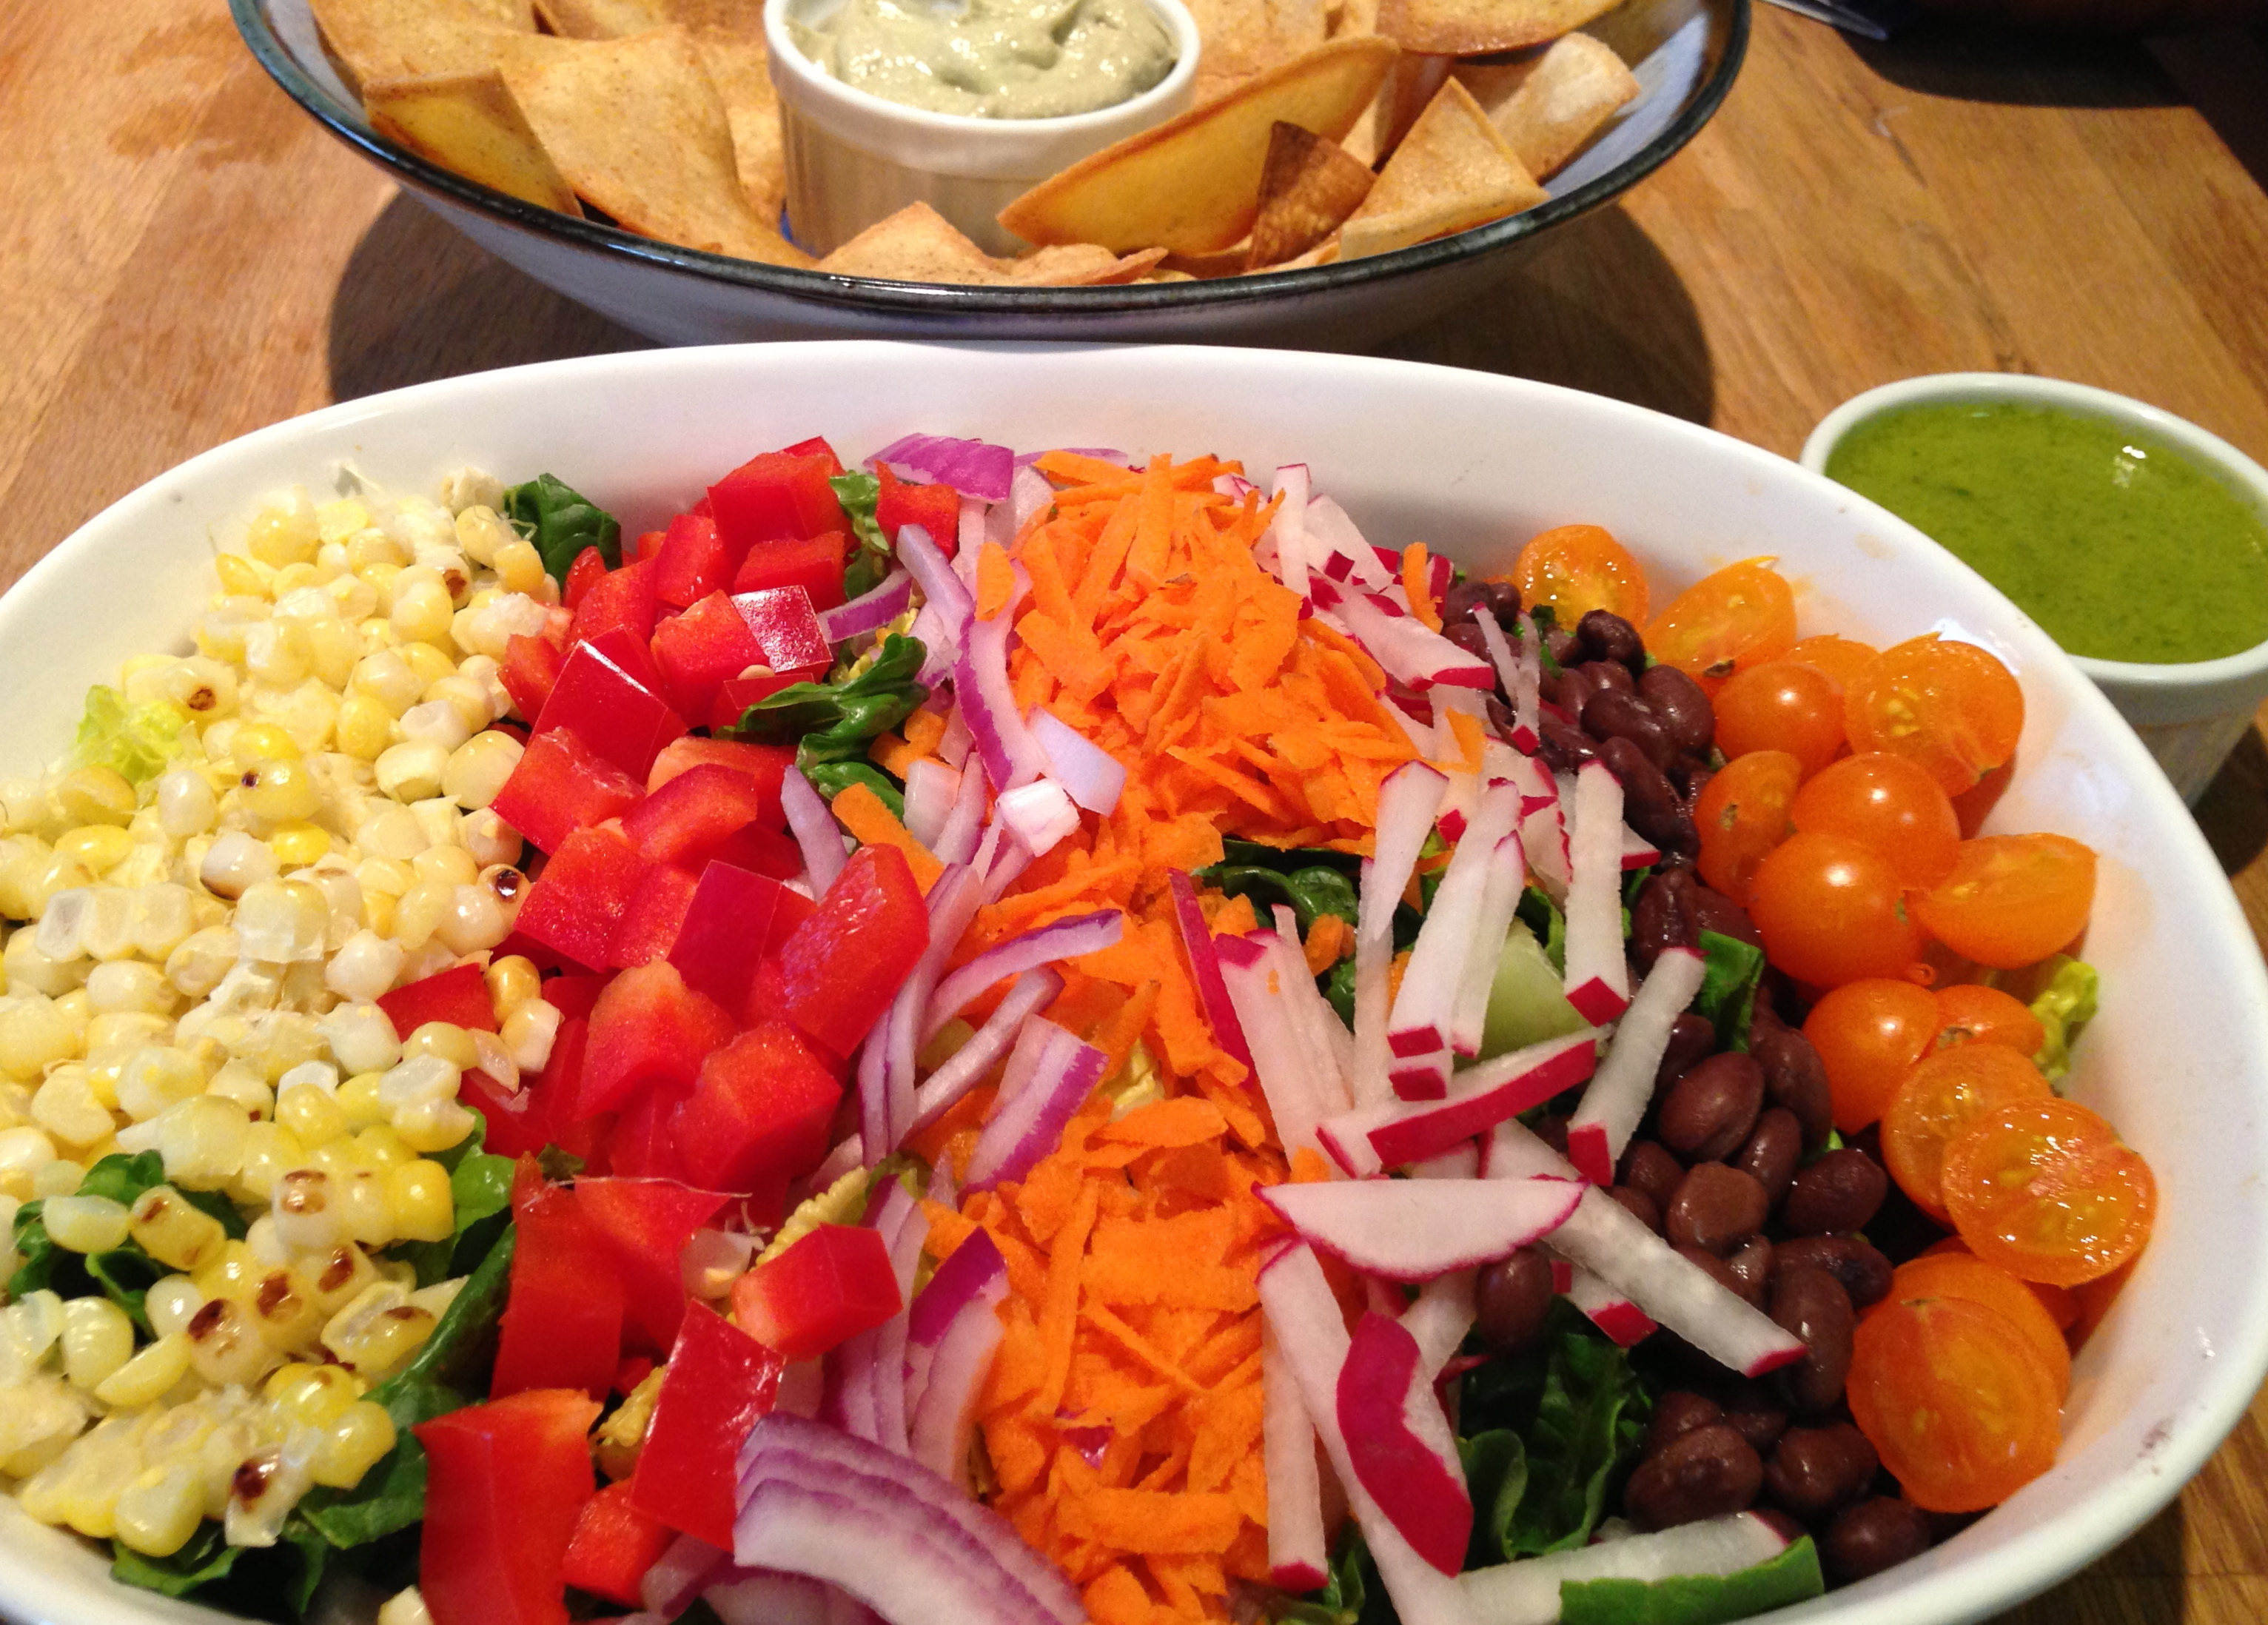
This post features a bunch of recipes. Not only is there the salad and dressing, but I also want to share this simple way to make baked chips. I served it with leftover vegan cashew avocado “cream” from these incredible tofu tacos I discovered on Love and Lemons.
To make the salad (I measured nothing):
Put some chopped romaine lettuce in a bowl.
Top with the following: I chose to do it cobb-salad style, but you can toss it all together, too. Go loco.
- radishes
- cherry tomatoes
- grilled corn (Soak it first for about a half an hour. Grill on medium-high for about 10 minutes, rotating a few times. Then, let it cool and cut it off the cob)
- shredded carrots
- chopped red bell peppers
- thinly sliced red onions
- drained black beans
- optional: shredded cheddar cheese
- You can also do: avocado, jicama, etc.
Basic cilantro-lime dressing:
Blend the following until smooth:
- 2 handfuls of cilantro
- juice of 2 limes
- a little bit of honey (or agave or sweetener of your choice)
- salt/pepper
- a few tablespoons of olive oil
- water to thin out as needed
For the chips:
- Preheat oven to 350 degrees
- Prepare oil: Mix together a few tablespoons of olive oil with spices of your choice. I did a few shakes of cumin and paprika, and then a few pinches of salt.
- Put a stack of corn tortillas on a cutting board and cut them into sixths (first cut in half and then cut each half into thirds)
- Arrange tortilla triangles in a single layer on a cookie sheet (no overlapping) and brush both sides with the oil mixture. Bake for 20-25 minutes, or until slightly brown and crispy.
- Serve with salad and dip of choice.

My challenge this morning was to create “salads” that could be eaten on a boat, picnic style. Whether you’re heading to a barbeque, movie night in the park, or any other occasion where utensils are a hassle, here are a few easy ideas:
The first is caprese salad…on a stick. You need:
- small mozzarella balls, cut in half
- a bunch of grape tomatoes
- basil leaves
- salt
- your favorite balsamic vinegar dressing (you can make your own by whisking/shaking equal parts vinegar and olive oil)
- toothpicks
Assemble toothpicks with the mozzarella on the bottom, flat side down so it can stand. Then, fold one basil leaf in half and put it on the toothpick. The grape tomato tops it off. Sprinkle with salt to taste. Just before serving, drizzle with balsamic dressing.
The other option is chopped up vegetables and some great dressing as dip. I went with Sang Lee’s sweet ginger dressing. The farmer’s market had quite a selection for dippable vegetables today. I went with: wax beans, red and green bell peppers, burpless cucumbers and carrots. I also used some home-grown roma beans.
OK, it may not be rocket science… but it’s August and sometimes we just want to cut vegetables and use them as a vehicle for good dip.

